Windows 11: Using the Windows Settings App for Personalization
Unlock Your Windows 11 Style: A Personalization Power Guide
Hey there, personalization pals!
Ever feel like your computer is just… blah? Like it’s missing that certainje ne sais quoithat truly screams "This ismyspace!"? We've all been there. You stare at the same default wallpaper day in and day out, the same bland taskbar, and the same icon arrangement that Windows decided was best for you (even though it clearly isn't). It’s like living in a beige-walled apartment complex when you dream of a vibrant, custom-designed loft.
The good news? Turning your Windows 11 machine into a reflection of your unique personality isn't some tech wizardry only accessible to the coding elite. It's actually surprisingly simple, and the key lies within the often-overlooked Windows Settings app. Think of it as your digital playground, a treasure trove of customization options just waiting to be explored.
Maybe you’re tired of the harsh, eye-straining white of the default light mode and crave the soothing embrace of dark mode. Or perhaps you're itching to ditch those boring default desktop backgrounds and replace them with stunning photos of your last vacation, your beloved pet, or maybe even some abstract art that speaks to your soul. The possibilities are endless!
But here’s the kicker: so many people just scratch the surface of what’s possible. They change the wallpaper and call it a day. They don’t realize the sheer power that lies within the Personalization settings. We’re talking about customizing everything from your accent colors to your lock screen, your taskbar behavior to your start menu layout. We’re talking about crafting a digital environment that not only looks amazing but also boosts your productivity and makes you genuinely happy to use your computer.
So, are you ready to ditch the drab and dive into the dazzling world of Windows 11 personalization? Are you ready to unleash your inner designer and transform your computer into a personalized powerhouse? Stick with me, friends, and we'll unlock the secrets of the Windows Settings app and turn your digital space into a true reflection of you. Trust me, you won't believe how much difference a little personalization can make. Let's get started, shall we?
Diving Deep into Windows 11 Personalization: Your Ultimate Guide
Alright, friends, let's get our hands dirty and really explore the awesome personalization options available within Windows 11. Forget those generic, cookie-cutter desktops; we’re about to embark on a journey to create a digital space that’s uniquelyyou. We’ll be focusing on the Settings app – your one-stop shop for all things customization.
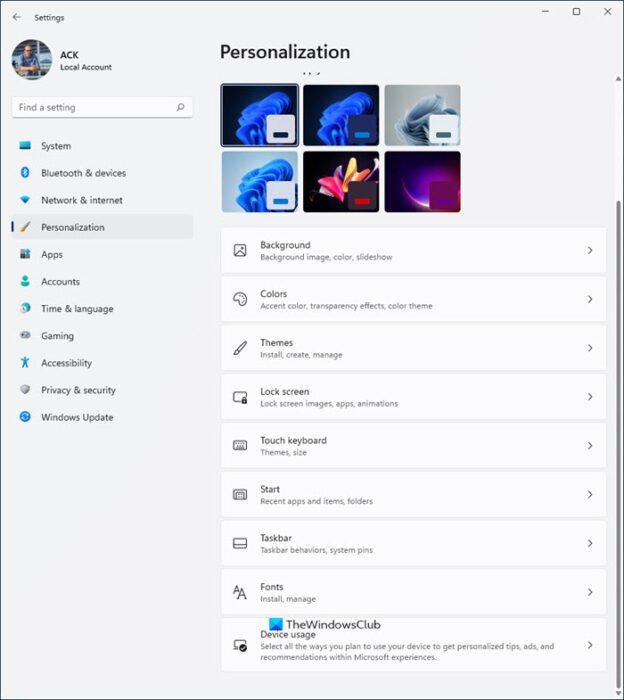
• Accessing the Personalization Settings: Your Gateway to Customization
First things first, let's get to the good stuff. Accessing the Personalization settings is super easy. There are a couple of ways to do it, but here’s the quickest: Right-click anywhere on your desktop. A menu will pop up, and you'll see "Personalize" at the bottom. Click it! Boom! You're in. Alternatively, you can press the Windows key + I to open the Settings app, then click on "Personalization" in the left-hand menu. Easy peasy, right?
• Background Bliss: Setting the Stage for Your Digital World
Okay, now that we're in the Personalization settings, let's start with the background. This is where you get to set the visual tone for your entire computer experience. Windows 11 offers several options: Picture, Solid Color, Slideshow, and Windows Spotlight.
Picture: This allows you to select a single image as your background. You can choose from the default Windows images or browse your own photos. Pro tip: use high-resolution images for the best visual quality. Nobody wants a pixelated wallpaper! Think vacation photos, stunning landscapes, or even cool abstract art you find online.
Solid Color: If you prefer a minimalist look, a solid color background might be just what you need. You can choose from a range of preset colors or even create your own custom color using the color picker. This is perfect for those who want a clean and distraction-free desktop.
Slideshow: Feeling indecisive? Why settle for one image when you can have a whole slideshow? This option allows you to select a folder of images that will rotate as your background. You can customize the interval between image changes and even choose to shuffle the images for a more random experience. Great for showcasing a collection of memories or a variety of inspiring images.
Windows Spotlight: This is a fun one! Windows Spotlight automatically downloads and displays stunning images from Bing as your background. It also occasionally offers interesting facts and tips about the displayed image. It's a great way to discover new and beautiful places around the world without lifting a finger. You can even provide feedback on the images you like or dislike, which helps Windows Spotlight learn your preferences.
• Colors: Adding a Touch of Personality to Your Interface
Moving on to colors! This section lets you customize the accent colors used throughout Windows 11, impacting everything from the Start menu and taskbar to window borders and buttons. You can choose from a variety of preset accent colors or let Windows automatically pick an accent color based on your background.
The "Choose your mode" option allows you to switch between Light and Dark mode. Light mode is bright and airy, while Dark mode is, well, dark and moody. Dark mode is generally easier on the eyes, especially in low-light environments. You can also choose "Custom" mode to set different modes for Windows and your apps. Experiment and see what looks best to you!
Under "Accent color," you can choose to show the accent color on the Start menu, taskbar, title bars, and window borders. This can add a subtle but noticeable pop of color to your interface. Be careful not to overdo it, though. Too much color can be distracting.
• Themes: Your One-Click Makeover Solution
Themes are like pre-packaged personalization bundles. They combine a background image, accent colors, sounds, and even mouse cursors to create a cohesive visual experience. Windows 11 comes with a few pre-installed themes, but you can also download more from the Microsoft Store.
Browsing the Microsoft Store for themes is like going on a digital shopping spree. You can find themes based on nature, animals, art, games, and just about anything else you can imagine. Once you find a theme you like, simply download and apply it. It's a quick and easy way to completely transform the look and feel of your computer.
You can also create your own custom themes by saving your current personalization settings. This is a great way to preserve your favorite color combinations, background images, and sounds for future use.
• Lock Screen: The First Impression of Your Digital Domain
The lock screen is the first thing you see when you turn on your computer, so why not make it a good one? Similar to the background settings, you can choose a picture, slideshow, or Windows Spotlight for your lock screen.
You can also choose which apps you want to show status information on the lock screen. For example, you might want to see the current weather, your upcoming calendar events, or the latest email notifications. This allows you to get a quick glimpse of important information without even unlocking your computer.
Don't forget to customize the lock screen timeout settings. This determines how long your computer will wait before automatically locking. If you're concerned about security, you might want to set a shorter timeout. If you find it annoying to constantly re-enter your password, you might want to set a longer timeout.
• Taskbar: Taming Your Digital Command Center
The taskbar is your digital command center, and Windows 11 offers a surprising amount of customization options. You can choose which icons to show on the taskbar, change the taskbar alignment (left, center, or right), and even hide the taskbar completely when it's not in use.
The "Taskbar behaviors" section is where you'll find the most interesting options. Here, you can choose whether to automatically hide the taskbar, show badges on taskbar apps, and even combine taskbar buttons for the same app. Experiment with these settings to find what works best for your workflow.
You can also customize the system tray icons, which are the small icons located in the bottom-right corner of the taskbar. You can choose which icons to show and even rearrange them to your liking. This is a great way to keep your taskbar clean and organized.
• Start Menu: Reclaiming Your Digital Launchpad
The Start menu has undergone some significant changes in Windows 11, and it's now more customizable than ever. You can choose which apps and folders to pin to the Start menu, rearrange the icons, and even create custom groups.
The "Personalization" settings allows you to customize the "Recommended" section of the Start menu, which shows recently opened apps and files. You can choose to show more or fewer recent items, and even disable the "Recommended" section completely if you prefer a cleaner look.
You can also customize the "Power" button in the Start menu. You can choose whether to show the Sleep, Shut down, or Restart options. This is a handy way to quickly access these essential functions.
• Fonts: Express Yourself Through Typography
Don't underestimate the power of fonts! Choosing the right font can significantly impact the readability and overall aesthetic of your computer. Windows 11 allows you to customize the system font used for menus, dialog boxes, and other interface elements.
While the default font (Segoe UI) is perfectly fine, you might want to experiment with other fonts to find one that better suits your personal style. There are tons of free and paid fonts available online. Just be sure to download fonts from reputable sources to avoid malware.
• Device Usage: Tailoring Your Windows Experience
Windows 11 also offers a device usage personalization setting. This setting allows Windows to tailor its recommendations and tips based on how you use your device. For example, if you primarily use your computer for gaming, Windows might suggest gaming-related features and apps.
This feature is entirely optional, and you can choose to disable it if you prefer. However, if you're open to receiving personalized recommendations, it can be a helpful way to discover new features and apps that you might find useful.
Friends, remember that the best personalization is the personalization that worksfor you. Don’t be afraid to experiment, try new things, and find what makes your digital space feel truly like home. So, go forth and personalize! Unleash your inner designer and create a Windows 11 experience that’s as unique as you are.
Q&A: Your Personalization Questions Answered
Alright, friends, let's tackle some common questions about Windows 11 personalization. I know diving into all these settings can be a bit overwhelming, so I'm here to clear up any confusion.
• Q: I changed my background, but it keeps reverting back to the default Windows wallpaper. What's going on?
A: This usually happens when Windows isn't properly activated. Make sure your copy of Windows 11 is activated by going to Settings > System > Activation. If it's not activated, you'll need to enter your product key or purchase a license. Another potential cause could be a syncing issue with your Microsoft account. Try signing out of your account and then signing back in.
• Q: How do I download more themes for Windows 11?
A: Downloading themes is super easy! Just open the Settings app and go to Personalization > Themes. Click on "Browse themes" to open the Microsoft Store. From there, you can browse through a vast selection of free and paid themes. Simply choose a theme you like and click "Get" to download and install it.
• Q: Can I use animated GIFs as my desktop background in Windows 11?
A: Unfortunately, Windows 11 doesn't natively support animated GIFs as desktop backgrounds. However, there are third-party apps that can help you achieve this. A quick search for "animated GIF wallpaper" on the Microsoft Store should turn up some options. Just be sure to download apps from reputable developers.
• Q: I accidentally messed up my taskbar settings. How do I reset it to the default configuration?
A: Don't worry, we've all been there! Resetting your taskbar is pretty straightforward. Right-click on the taskbar and select "Taskbar settings." Scroll down to the "Taskbar behaviors" section and click on Reset.This will restore your taskbar to its default settings. You can also try creating a new user account, as the default taskbar settings will be applied to the new account.
Conclusion: Your Personalized Windows 11 Awaits!
Friends, we've reached the end of our personalization journey, and I hope you're feeling inspired to transform your Windows 11 experience. We've explored the key areas of the Personalization settings, from backgrounds and colors to themes, lock screens, taskbars, and Start menus. We've discussed how to customize everything to your liking, creating a digital space that reflects your unique personality and boosts your productivity.
The power to personalize is at your fingertips. It's about making your computer a comfortable and inspiring place to work, play, and create. It's about ditching the generic and embracing the unique. It's about making your digital world trulyyours.
So, what’s next? I challenge you to take action today. Spend just 15 minutes exploring the Personalization settings and make at least one change to your computer's appearance. Maybe it's as simple as changing your background or switching to dark mode. Or maybe you're feeling adventurous and want to download a new theme. Whatever you choose, just take that first step.
Remember, personalization is an ongoing process. Don't be afraid to experiment, try new things, and constantly refine your settings until you achieve the perfect balance of aesthetics and functionality. Your personalized Windows 11 experience awaits!
Now go forth and create! What small change will you make to your Windows 11 today?
Post a Comment for "Windows 11: Using the Windows Settings App for Personalization"
Post a Comment