Windows 11: How to Use the Windows Settings App
Windows 11 Settings App: Your Ultimate Guide to Customization
Learn how to master the Windows 11 Settings app and personalize your PC like a pro! This guide unlocks hidden features and simplifies customization for ultimate control.
Hey there, tech enthusiasts! Ever feel like your computer is runningyouinstead of the other way around? Like it's got a mind of its own when it comes to notifications, display settings, and even something as simple as the default browser? We've all been there. The truth is, your Windows 11 machine is incredibly customizable, and the key to unlocking that power lies within the Windows Settings app.
Think of the Settings app as your personal control center for all things Windows 11. It’s the place where you can tweak almost every aspect of your system to perfectly match your needs and preferences. From personalizing your desktop to managing your network connections and ensuring your privacy, the Settings app is where the magic happens.
But let's be honest, sometimes navigating the Settings app can feel like wandering through a digital maze. All those menus, submenus, and cryptic options… it can be overwhelming! It's like trying to find theonematching sock in a mountain of laundry – frustrating and time-consuming. Many users just stick to the default settings, missing out on a world of possibilities that could significantly improve their computing experience.
Have you ever wished you could get rid of those annoying notification pop-ups in the lower right corner? Or wanted to change the color scheme to something a little less… eye-searing? Or maybe you just want to understand why your battery seems to drain faster than a cup of coffee on a Monday morning.
Well, the Windows 11 Settings app holds the answers to all these questions and more! It’s the secret weapon for taking control of your digital life. Imagine being able to effortlessly customize your PC to suitexactlywhat you need. No more random notifications interrupting your flow. No more straining your eyes at a screen that's too bright. Just a smooth, personalized experience that makes using your computer a joy.
In this comprehensive guide, we're going to demystify the Windows 11 Settings app, breaking down each section and showing you exactly how to use it to your advantage. We'll cover everything from basic personalization to advanced system settings, all explained in plain English (no confusing jargon allowed!).
Ready to transform your Windows 11 experience from frustrating to fantastic? Keep reading, and we'll unlock the secrets of the Settings app together! So, buckle up, grab your favorite beverage, and let's dive into the world of Windows 11 customization. You might be surprised at how much power you already have at your fingertips. Are you ready to discover hidden features and personalize your PC like never before?
Getting Started with the Windows 11 Settings App
Accessing the Settings App: Multiple Paths, One Destination
There are several ways to open the Settings app in Windows 11, catering to different user preferences. Knowing these different methods ensures thatyoucan access the settings quickly and efficiently, no matter whatyou'redoing.
The Start Menu: This is arguably the most straightforward method. Simply click on the Start button (the Windows logo in the bottom-left corner of your screen), and then look for the "Settings" icon. It usually appears as a gear or cogwheel. Click it, andyou'rein! This is often the first method that comes to mind for new users.
The Quick Actions Menu: This is a great option whenyouneed to access settings on the fly. Press the Windows key + Ato open the Quick Actions menu, located in the bottom-right corner of your screen (where the network, volume, and battery icons are).You'llfind a "Settings" button there as well. This is incredibly convenient for quickly adjusting volume, brightness, or connecting to a Wi-Fi network.
The Win + I Shortcut: For the keyboard shortcut enthusiasts out there, pressing Windows key + Iwill directly launch the Settings app. This is the quickest method onceyouget used to it and becomes second nature after a while. It's the preferred method for power users who like to keep their hands on the keyboard.
Using the Search Bar: Ifyou'rehaving trouble finding the Settings icon, or just prefer using the search bar, simply type "Settings" into the search bar on the taskbar. The Settings app will appear as the top result. Click it, andyou'regood to go! This method is helpful ifyoucan't remember where the icon is located or ifyou'vecustomized your Start menu.
No matter which methodyouchoose, accessing the Settings app is a breeze. Now thatyouknow how to get there, let's explore the different sections and see whatyoucan customize!You'llbe surprised at the level of controlyouhave over your Windows 11 experience.
Understanding the Settings App Interface: A Quick Tour
The Windows 11 Settings app is organized into several main categories, each focusing on a specific aspect of your system. Familiarizingyourselfwith these categories is essential for navigating the app efficiently and finding the settingsyou'relooking for.
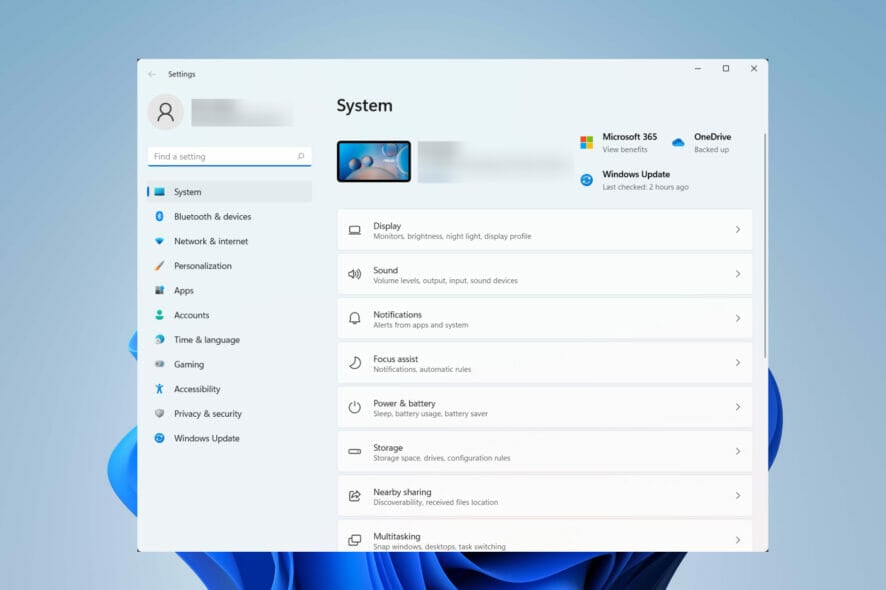
System: This is whereyou'llfind settings related to your display, sound, notifications, power & battery, storage, and remote desktop. It's the go-to section for configuring the core functionalities of your computer. Think of it as the central nervous system of your Windows 11 experience.
Bluetooth & devices: This section allowsyouto manage all your connected devices, including Bluetooth devices, printers, mice, keyboards, cameras, and more. Ifyou'rehaving trouble connecting a device or want to configure its settings, this is the place to be.
Network & internet: This category deals with your network connections, including Wi-Fi, Ethernet, VPN, and mobile hotspot.Youcan use it to troubleshoot network problems, change your network settings, and manage your data usage.
Personalization: This is whereyoucan customize the look and feel of your Windows 11 system, including your background, themes, colors, lock screen, and taskbar. It's the fun section whereyoucan make your computer trulyyours.
Apps: This section allowsyouto manage the applications installed on your computer, including uninstalling apps, managing startup apps, and configuring default apps.Youcan also find settings related to optional features and app execution aliases here.
Accounts: This category deals with your user accounts, including your Microsoft account, email accounts, and sign-in options.Youcan use it to change your password, add or remove accounts, and manage your account security.
Time & language: This section allowsyouto configure your date, time, region, and language settings.Youcan also find settings related to speech recognition and typing.
Gaming: Ifyou'rea gamer, this section is foryou. It allowsyouto configure settings related to Xbox Game Bar, game mode, and graphics settings.
Accessibility: This category contains settings that make Windows 11 easier to use for people with disabilities, including settings for vision, hearing, and interaction.
Privacy & security: This section is crucial for protecting your privacy and security.Youcan manage your privacy settings for location, camera, microphone, notifications, and more.Youcan also find settings related to Windows Security and diagnostic data.
Windows Update: This section allowsyouto check for and install Windows updates. It's essential to keep your system up-to-date to ensure thatyouhave the latest security patches and features.
By understanding the organization of the Settings app,youcan quickly navigate to the sectionyouneed and find the settingsyou'relooking for. Now thatyouknow your way around, let's dive into some specific customization options!
Using the Search Function within Settings: Your Digital GPS
Even with a good understanding of the Settings app categories, sometimes finding a specific setting can still be a challenge. Fortunately, Windows 11 includes a powerful search function within the Settings app that can helpyoulocate exactly whatyou'relooking for.
The search bar is located at the top of the Settings app window. Simply type in a keyword or phrase related to the settingyou'retrying to find, and the Settings app will display a list of relevant results.
For example, ifyouwant to change your mouse settings, simply type "mouse" into the search bar. The search results will include options for changing your mouse pointer speed, button configuration, and scroll settings.
The search function is incredibly versatile and can be used to find settings related to almost any aspect of your system. It's like having a digital GPS that guidesyoudirectly to the settingyouneed, savingyoutime and frustration.
Here are some tips for using the search function effectively: Use specific keywords: The more specific your search query, the more accurate the results will be. For example, instead of typing "display," try typing "change display resolution." Try different variations: If your initial search doesn't yield the desired results, try using different variations of the keyword or phrase. For example, instead of typing "battery," try typing "power," "battery life," or "battery settings." Explore the search suggestions:Asyoutype, the search bar will display a list of search suggestions. These suggestions can helpyounarrow down your search and find the exact settingyou'relooking for.
The search function within the Settings app is a powerful tool that can saveyoua lot of time and effort. Use it to your advantage, andyou'llbe able to find and configure any setting in Windows 11 with ease.
Personalizing Your Windows 11 Experience
Customizing Your Desktop Background: A Fresh Look Every Day
One of the simplest and most effective ways to personalize your Windows 11 experience is to customize your desktop background.Yourbackground is the first thingyousee whenyoulog in, so choosing an image thatyoulove can significantly improve your mood and create a more enjoyable computing environment.
To change your desktop background, navigate to Settings > Personalization > Background. Here,you'llfind several options: Picture:Choose a static image from your computer or download one from the internet.Youcan select a single image, oryoucan choose a folder of images, and Windows will automatically cycle through them.
Solid color: Choose a solid color for your background. This is a great option ifyouprefer a minimalist look or find that images are distracting.
Slideshow: Select a folder of images, and Windows will automatically cycle through them at a specified interval. This is a great way to keep your desktop looking fresh and interesting.
Windows spotlight: Let Windows choose a stunning image from its collection. These images are often breathtaking landscapes or cityscapes, and they change automatically every day.
Youcan also choose how the image is displayed on your screen.Youcan choose to fill the screen, fit the image, stretch it, tile it, or center it. Experiment with different options to find the one that looks best on your screen.
Changing your desktop background is a quick and easy way to add a personal touch to your Windows 11 experience. So, go ahead and choose an image thatyoulove and make your desktop trulyyours!
Adjusting Themes and Colors:Setting the Mood
Beyond the background,youcan also customize the overall theme and colors of your Windows 11 system. This allowsyouto create a visually appealing and consistent look that matches your personal style.
Navigate to Settings > Personalization > Themesto choose a pre-built theme. Themes are collections of settings that include a background image, accent color, sound scheme, and mouse cursor. Windows 11 comes with several pre-built themes to choose from, oryoucan download additional themes from the Microsoft Store.
Ifyouwant to customize the colors of your system, navigate to Settings > Personalization > Colors. Here,youcan choose an accent color, which will be used for buttons, menus, and other UI elements.Youcan also choose whether to use the accent color on your Start menu, taskbar, and title bars.
Windows 11 also includes a dark mode, which changes the overall color scheme to a darker palette. This can be easier on your eyes, especially in low-light conditions. To enable dark mode, select "Dark" from the "Choose your mode" dropdown menu. Or, to have the mode follow the system, you can select "Custom" and set a default Windows mode and a default app mode.
Experimenting with different themes and colors is a great way to personalize your Windows 11 experience and create a look thatyoulove. So, go ahead and play around with the settings and see whatyoucan create!
Customizing the Taskbar and Start Menu: Your Launchpad
The taskbar and Start menu are essential elements of the Windows 11 interface. Customizing them can significantly improve your workflow and make it easier to access the apps and informationyouneed.
To customize the taskbar, navigate to Settings > Personalization > Taskbar. Here,youcan choose which icons are displayed on the taskbar, as well as configure the taskbar behaviors, such as automatically hiding the taskbar in desktop mode.
To customize the Start menu, navigate to Settings > Personalization > Start. Here,youcan choose which apps are displayed in the Start menu, as well as configure the Start menu layout.Youcan also choose to show or hide the most used apps and recently added apps.
One of the most significant changes in Windows 11 is the centered taskbar and Start menu. However, ifyouprefer the traditional left-aligned taskbar,youcan change it in the Taskbar behaviors settings.
Customizing the taskbar and Start menu is a great way to optimize your Windows 11 experience for your specific needs. So, take some time to configure these settings and make them work foryou.
Managing System Settings for Optimal Performance
Adjusting Power and Battery Settings: Extending Battery Life
Optimizing power and battery settings is crucial for laptop users who want to extend their battery life. Windows 11 provides several options for managing your power consumption and maximizing your battery performance.
To access the power and battery settings, navigate to Settings > System > Power & battery. Here,you'llfind several options: Battery saver:This mode reduces your device's power consumption by limiting background activity and reducing screen brightness.Youcan configure battery saver to turn on automatically when your battery reaches a certain level.
Power mode: This setting allowsyouto choose between different power modes, such as "Best power efficiency," "Balanced," and "Best performance." The "Best power efficiency" mode will prioritize battery life, while the "Best performance" mode will prioritize performance.
Screen and sleep: These settings allowyouto configure how long your screen stays on and how long your computer waits before going to sleep. Reducing these times can significantly reduce your power consumption.
Battery usage: This section showsyouwhich apps are using the most battery power.Youcan use this information to identify and close apps that are draining your battery.
By adjusting these settings,youcan significantly extend your laptop's battery life and ensure thatyoucan work or play for longer without needing to plug in.
Managing Storage: Freeing Up Space and Optimizing Performance
Managing your storage space is essential for keeping your Windows 11 system running smoothly. When your hard drive is full, your computer can become slow and sluggish. Windows 11 provides several tools for managing your storage space and freeing up disk space.
To access the storage settings, navigate to Settings > System > Storage. Here,you'llfind several options: Storage Sense:This feature automatically frees up disk space by deleting temporary files, recycle bin contents, and other unnecessary files.Youcan configure Storage Sense to run automatically at regular intervals.
Storage breakdown: This section showsyouhow your storage space is being used by different categories of files, such as apps, documents, pictures, and videos.Youcan use this information to identify and delete files thatyouno longer need.
Temporary files: This section allowsyouto manually delete temporary files, such as those created by web browsers and Windows Update.
Large or unused files: This feature will suggest files that may not be needed and can be deleted.
By using these tools,youcan easily manage your storage space and keep your Windows 11 system running smoothly.
Managing App Permissions: Protecting Your Privacy
Controlling which applications have access to certain system resources, such as your camera, microphone, and location, is crucial for protecting your privacy. Windows 11 allowsyouto manage app permissions and control which apps have access to sensitive information.
To manage app permissions, navigate to Settings > Privacy & security. Here,you'llfind several options: App permissions:This section allowsyouto control which apps have access to your location, camera, microphone, contacts, calendar, and other sensitive information.
General: This section allowsyouto control whether apps can access your advertising ID, which is used to track your activity across different apps.
Diagnostics & feedback: This section allowsyouto control how much diagnostic data is sent to Microsoft.Youcan choose to send basic or full diagnostic data.
By carefully managing app permissions,youcan protect your privacy and prevent apps from accessing information thatyoudon't want them to have.
Staying Updated and Secure
Checking for Windows Updates: Keeping Your System Safe
Keeping your Windows 11 system up-to-date is essential for ensuring thatyouhave the latest security patches, bug fixes, and features. Windows Update automatically checks for and installs updates in the background, butyoucan also manually check for updates at any time.
To check for updates, navigate to Settings > Windows Update. Here,you'llfind a button that says "Check for updates." Click this button to manually check for updates. If updates are available, Windows will download and install them automatically.
Youcan also configure Windows Update to automatically install updates at a specific time. This can be useful ifyouwant to avoid having updates installed during your working hours.
Regularly checking for and installing Windows updates is essential for keeping your system safe and secure.
Managing Windows Security: Protecting Against Threats
Windows Security is a built-in security suite that protects your system against viruses, malware, and other threats. It includes a real-time antivirus scanner, as well as tools for managing your firewall and network security.
To access Windows Security, navigate to Settings > Privacy & security > Windows Security. Here,you'llfind several options: Virus & threat protection:This section allowsyouto run a virus scan, manage your antivirus settings, and view your protection history.
Account protection: This section helpsyouprotect your Microsoft account by enabling two-factor authentication and setting up a security key.
Firewall & network protection: This section allowsyouto manage your firewall settings and configure network security rules.
App & browser control: This section helpsyouprotect your system against malicious apps and websites.
Regularly checking Windows Security and ensuring that all features are enabled is essential for protecting your system against threats.
The Windows 11 Settings app is a powerful tool that putsyouin control of your computing experience. From personalizing your desktop to managing system settings and ensuring your security, the Settings app provides a wealth of options for customizing Windows 11 to meet your specific needs. Don't be afraid to explore the different sections and experiment with the settings.Youmight be surprised at how muchyoucan improve your Windows 11 experience with just a few tweaks.
And with that, friends,we'vereached the end of our ultimate guide to the Windows 11 Settings app! We've journeyed through the digital landscape, uncovering hidden gems and demystifying complex settings.You'renow equipped with the knowledge to personalize your PC, optimize performance, and ensure top-notch security.
Remember, the power to shape your Windows 11 experience lies in your hands. Don't settle for the default settings – dive in, experiment, and make your computer trulyyours. The Settings app is your playground; use it to create a digital environment that is both functional and enjoyable.
Now, for your call to action: take whatyou'velearned today and implement at least three changes in your Settings app. It could be something as simple as changing your desktop background or as impactful as optimizing your power settings. The key is to take action and put your newfound knowledge to good use!
By consistently utilizing the Windows 11 Settings app,youcan unlock the full potential of your computer, enhance your productivity, and create a personalized digital space that reflects your unique style. So, go forth and conquer, armed with the knowledgeyou'vegained!
And remember, technology is constantly evolving, so continue to explore, learn, and adapt. Perhaps, is there a specific area of the Windows 11 Settings app thatyou'restill curious about or would like to explore further? Keep that curiosity alive, andyou'llalways be one step ahead!
Post a Comment for "Windows 11: How to Use the Windows Settings App"
Post a Comment