Windows 11: How to Use Virtual Desktops
Windows 11: Unleash Your Productivity with Virtual Desktops
Hey friends! Juggling multiple windows, programs, and thoughts can feel like herding cats on a caffeine rush, right? Learn how to use virtual desktops in Windows 11 to boost your productivity and keep everything organized, it's surprisingly simple, and we will tell you everything you need to know!
Windows 11: How to Use Virtual Desktops
Let's be honest, the digital world can feel like a chaotic workspace sometimes. Imagine your computer desktop as a real-life desk. Now, imaginethatdesk overflowing with papers, sticky notes, half-eaten snacks, and a concerning number of coffee mugs. That’s probably pretty close to what your Windows 11 desktop looks like right now, right? Don't worry, you're not alone!
For many people, the taskbar at the bottom of the screen becomes a cluttered mess of icons. Switching between applications often involves a frantic clicking spree, desperately trying to find therightwindow amidst the digital chaos. This constant context-switching isn’t just annoying; it's a productivity killer! Studies show that multitasking, or even attempting to multitask, significantly reduces efficiency and increases stress levels. Our brains just aren’t designed to handle that level of constant interruption.
So, what's the solution? Are we doomed to live in a perpetual state of digital disarray? Thankfully, the answer is a resounding no! Windows 11 offers a powerful and often overlooked feature calledvirtual desktops. Think of virtual desktops as multipleseparateworkspaces within your computer. Each desktop can contain its own set of open applications, allowing you to organize your tasks and projects in a way that makes sense toyou.
Imagine having one virtual desktop dedicated entirely to work. You could have your email client, word processor, spreadsheet software, and project management tools all neatly organized and ready to go. No distracting social media tabs, no personal email notifications popping up – just pure, unadulterated productivity.
Then, you could have another virtual desktop dedicated to entertainment. Load up your favorite streaming service, open a game, or browse social media without cluttering your work environment. It’s like having separate computers for different aspects of your life, all contained within a single device.
This isn't just about aesthetics, although a clean, organized desktopisundeniably satisfying. Virtual desktops can drastically improve your focus and concentration. By minimizing distractions and keeping your tasks compartmentalized, you can work more efficiently and effectively. It's like having a dedicated office space for each project, allowing you to immerse yourself fully in the task at hand.
But here's the real kicker:many people don't evenknowabout virtual desktops, or if they do, they’re not sure how to use them. They're missing out on a powerful tool that can transform their computing experience. It's like having a secret weapon against digital clutter and inefficiency, just waiting to be unleashed.
In this guide, we're going to walk you through everything you need to know about using virtual desktops in Windows 11. We'll cover the basics, like creating and switching between desktops, as well as more advanced tips and tricks to help you customize your workflow. We’ll even show you how to make the most of keyboard shortcuts to supercharge your productivity.
Are you ready to say goodbye to digital chaos and hello to a more organized, focused, and productive you? Stick around, because we’re about to dive into the wonderful world of Windows 11 virtual desktops! What if you could increase your productivity by 20% just by learning a few simple keyboard shortcuts? Let’s find out!
Getting Started with Virtual Desktops in Windows 11
Ready to get your virtual desktop game on? It's easier than you might think. Let's walk through the basics so you can start creating a more organized and efficient workspace.
Creating a New Virtual Desktop
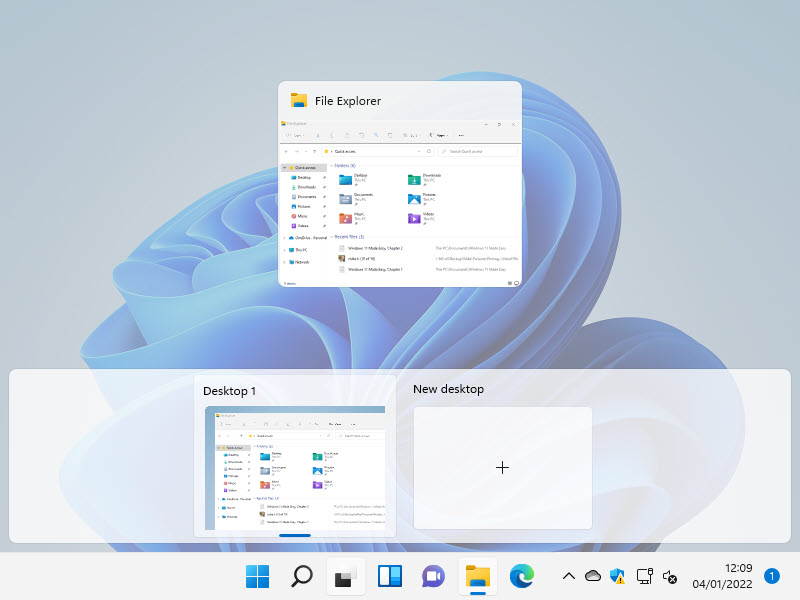
The first step, naturally, is creating a virtual desktop. Windows 11 makes this incredibly simple. Here are a couple of ways to do it: Using Task View: Look down at your taskbar, and you should see a little icon that looks like two overlapping rectangles (or squares). This is the Task View button. Clicking on it will display all your open windows and, more importantly, give you access to the virtual desktop interface. At the bottom of the screen, you'll see a section labeled "New desktop." Just click the "+" button, andvoila! A brand new, squeaky-clean virtual desktop is born. Keyboard Shortcut Magic:For those who prefer the speed and efficiency of keyboard shortcuts, here's a winner: Press the Windows key + Ctrl + Dsimultaneously. This instantly creates a new virtual desktop and automatically switches you to it. Talk about a productivity booster!
Switching Between Virtual Desktops
Okay, you've created a virtual desktop. Now, how do you actuallyuseit? Switching between desktops is just as easy as creating them.
Task View Again: Once again, the Task View button comes to the rescue. Click it, and you'll see all your virtual desktops displayed at the bottom of the screen. Simply click on the desktop you want to switch to. Keyboard Shortcut for the Win: Another awesome keyboard shortcut to remember: Windows key + Ctrl + Left/Right arrow keys. This allows you to quickly cycle through your virtual desktops in either direction. Practice this one, and you'll be switching desktops like a pro in no time!
Closing a Virtual Desktop
When you're done with a particular task or project, you might want to close the associated virtual desktop. Here's how: Back to Task View: Head back to Task View by clicking the button on the taskbar. Hover your mouse cursor over the virtual desktop you want to close. You'll see a small "X" appear in the top-right corner of the desktop preview. Click the "X," and the desktop will be closed. Important Note: When you close a virtual desktop, any open windows on that desktop will automatically be moved to thepreviousdesktop. So, don't worry about losing your work!
Customizing Your Virtual Desktop Experience
Now that you know the basics, let's dive into some ways to personalize your virtual desktop setup and make it even more useful. Because let's face it, customization is key to a truly enjoyable computing experience.
Renaming Your Virtual Desktops
Giving your virtual desktops descriptive names can make it much easier to keep track of what's what. Instead of just seeing "Desktop 1," "Desktop 2," and so on, you can label them "Work," "Gaming," "Social," or whatever makes sense for your workflow.
How to Rename: Open Task View. At the top of each virtual desktop preview, you'll see the current name (e.g., "Desktop 1"). Click on the name, and it will become editable. Type in your desired name and press Enter. Simple as that!
Changing Desktop Backgrounds
Want to take customization to the next level? You can set different background images for each virtual desktop. This provides a visual cue to help you quickly identify which desktop you're on.
Personalization Settings: Right-click on an empty area of your desktop and select Personalize.In the Settings app, go to Background.Here, you can choose a picture, solid color, or slideshow as your background. Important Detail: When you change the background, Windows will apply it to thecurrentvirtual desktop. So, make sure you're on the right desktop before making the change! Repeat the process for each desktop you want to customize.
Moving Windows Between Desktops
Sometimes, you might accidentally open a window on the wrong virtual desktop, or you might decide that a particular application would be better suited to a different workspace. Fortunately, moving windows between desktops is a breeze.
Task View is Your Friend: Open Task View. Find the window you want to move. Right-click on the window's preview. In the context menu, you'll see an option like "Move to" followed by a list of your virtual desktops. Select the destination desktop, and the window will be moved.
Pinning Windows Across All Desktops
There are certain applications that you might want to have accessible oneveryvirtual desktop. Think of things like your email client, your music player, or a messaging app. Pinning a window ensures that it's always available, no matter which desktop you're on.
Pinning Process: Open Task View. Find the window you want to pin. Right-click on the window's preview. In the context menu, select "Show this window on all desktops." Alternatively, you can choose "Show windows from this app on all desktops" to pin all windows from the same application.
Advanced Virtual Desktop Tips and Tricks
Now that you're a virtual desktop pro, let's explore some advanced techniques to really unlock the power of this feature. These tips can help you streamline your workflow and maximize your productivity.
Using Virtual Desktops for Specific Tasks
One of the most effective ways to use virtual desktops is to dedicate each desktop to a specific task or project. This helps you stay focused and avoid distractions.
Example Scenarios:
Work Desktop: Email, word processor, spreadsheet software, project management tools.
Communication Desktop: Messaging apps, social media, video conferencing.
Creative Desktop: Graphic design software, video editing tools, music production software.
Entertainment Desktop: Streaming services, games, web browser for leisure browsing.
Keyboard Shortcuts: Your Productivity Superpower
We've already covered a few basic keyboard shortcuts, but here's a quick recap and some additional gems: Win + Ctrl + D: Create a new virtual desktop. Win + Ctrl + Left/Right arrow keys: Switch between virtual desktops. Win + Ctrl + F4: Close the current virtual desktop. Win + Tab: Open Task View (alternative to clicking the button on the taskbar).
Mastering these keyboard shortcuts will allow you to navigate your virtual desktops with lightning speed.
Virtual Desktops and Multiple Monitors
If you're lucky enough to have multiple monitors, you can extend your virtual desktop setup across all of them. This creates an even more expansive and immersive workspace.
How it Works: When you switch to a different virtual desktop, the content onallof your monitors will change accordingly. Each monitor will display the windows and applications associated with the selected desktop. Configuration: Windows typically handles multi-monitor setups automatically. However, you can adjust the display settings in the Settings app (System > Display) if needed.
Troubleshooting Common Issues
While virtual desktops are generally reliable, you might occasionally encounter a few minor issues. Here are some common problems and how to fix them: Windows Not Appearing on the Correct Desktop: Make sure you haven't accidentally pinned the window to all desktops. Also, double-check that you're moving the window to the correct destination desktop in Task View. Performance Issues: If you're running a lot of applications across multiple virtual desktops, it could potentially impact performance. Try closing any unnecessary applications or upgrading your computer's hardware. Missing Taskbar Icons:In rare cases, the taskbar icons for pinned applications might disappear. Restarting your computer usually resolves this issue.
Windows 11 Virtual Desktops: The Verdict
Friends, we've journeyed through the realm of Windows 11 virtual desktops, and hopefully, you're feeling empowered to conquer your digital chaos and boost your productivity!
We started by acknowledging the struggles of a cluttered desktop, the constant context-switching, and the overall feeling of being overwhelmed by too many open windows. Then, we introduced virtual desktops as a powerful solution, a way to create separate workspaces within your computer and organize your tasks in a more meaningful way.
We covered the basics: creating new desktops, switching between them, and closing them when you're done. We also explored customization options, like renaming your desktops and changing their backgrounds, to create a more personalized and visually appealing experience.
Then, we delved into advanced tips and tricks, such as using virtual desktops for specific tasks, mastering keyboard shortcuts for lightning-fast navigation, and leveraging the power of virtual desktops with multiple monitors. We even addressed some common troubleshooting issues to ensure a smooth and seamless experience.
The key takeaway is that virtual desktops are not just a cosmetic feature; they're a powerful tool that can significantly improve your focus, concentration, and overall productivity. By minimizing distractions, keeping your tasks compartmentalized, and creating dedicated workspaces for different projects, you can work more efficiently and effectively.
So, what are you waiting for? It's time to take action and unleash the power of virtual desktops in Windows 11! Start by creating a few virtual desktops and experimenting with different configurations. Find what works best foryouand your workflow. Don't be afraid to get creative and try new things. The possibilities are endless!
We encourage you to start small. Create two or three virtual desktops to separate your work and personal activities. As you become more comfortable with the feature, you can expand your setup and create more specialized desktops for different projects or tasks.
Share this knowledge with your friends and family! Help them escape the digital clutter and discover the benefits of virtual desktops. Who knows, you might just start a productivity revolution!
Now go forth and conquer your digital world, one virtual desktop at a time! Imagine what you could accomplish with a clear mind and an organized workspace. You’ve got this! Are you ready to transform your computing experience and unlock your full potential? Go for it, and let us know how it goes!
Post a Comment for "Windows 11: How to Use Virtual Desktops"
Post a Comment