Windows 11: How to Use the Task Manager to Improve Performance
Is your Windows 11 PC running slow? Learn how to use Task Manager to diagnose problems, kill resource-hogging processes, and boost your computer's speed!
Windows 11: Unleash Your PC's Potential with Task Manager
Hey friends! Ever feel like your Windows 11 PC is wading through molasses instead of breezing through tasks? You're clicking, waiting, clicking some more… it's enough to make you want to chuck the thing out the window, right? We've all been there. Your computer, once a zippy stallion, slowly transforms into a digital donkey overnight. What gives?
One major culprit is often hidden in plain sight: rogue processes and background applications hogging all your precious system resources. These resource hogs can cripple even the most powerful machines, leading to frustrating lag, slow load times, and overall poor performance. It's like having a bunch of freeloaders eating all the pizza at a party while you're stuck doing all the work.
The good news? Windows 11 has a built-in superhero ready to tackle these performance-killing villains: Task Manager. Yes, that trusty little utility you probably only open when a program freezes. But Task Manager isso much morethan just a force-quit tool. It's a powerful diagnostic and management hub that can help you pinpoint performance bottlenecks, identify resource-intensive applications, and ultimately, optimize your system for smoother, faster operation.
Think of Task Manager as your PC's doctor. It can diagnose what's ailing your machine and give you the tools to administer the cure. It lets you see exactly which programs are using the most CPU, memory, disk, and network resources. This allows you to make informed decisions about which apps to close, disable, or even uninstall.
Imagine you’re playing your favorite game, and suddenly, it starts stuttering like crazy. Instead of blindly blaming the game itself, you can pop open Task Manager and see if some background process – maybe a rogue update or a sneaky cryptocurrency miner (yes, they exist!) – is sucking up all the processing power.
But Task Manager isn't just for diagnosing problems. It can also help you prevent them in the first place. By understanding which programs start automatically with Windows, you can disable unnecessary startup apps and significantly reduce your boot time. No more waiting an eternity for your computer to finally become usable!
This guide will walk you through everything you need to know about using Task Manager to improve your Windows 11 performance. We'll cover how to open Task Manager, understand its various tabs and features, and use them to identify and resolve performance issues. We'll even delve into some advanced techniques for optimizing your system and keeping it running smoothly.
Ready to take control of your Windows 11 PC and unleash its full potential? Let's dive in and transform your digital donkey back into a zippy stallion! Are you ready to reclaim your computer's speed and efficiency? Let’s begin!
Accessing the Power: How to Open Windows 11 Task Manager
Opening Task Manager in Windows 11 is surprisingly easy, and there are several ways to do it, depending on your preference. Think of it as having multiple entrances to the same amazing performance-boosting club! Here are some of the most common methods: The Classic Ctrl+Shift+Esc: This is the tried-and-true method that has been around for ages. Simply press the Ctrl, Shift, and Esckeys simultaneously. Task Manager should pop right up. This is usually the fastest and most reliable method, especially if your system is already running slowly.
Right-Click the Start Button: The Start button (the Windows logo in the bottom-left corner of your screen) offers a convenient shortcut. Right-click on the Start button, and you'll see a menu appear. In that menu, you should find an option labeled "Task Manager." Click it, and voila!
Ctrl+Alt+Delete (The Security Screen): Pressing Ctrl, Alt, and Deletesimultaneously will bring up the security screen. From here, you'll see several options, including "Task Manager." Click on it to launch the application. While this method requires an extra click, it's a good alternative if the other methods aren't working.
Using the Run Dialog Box: Press the Windows key + Rto open the Run dialog box. Typetaskmgr(all one word, no spaces) and press Enteror click OK. This will launch Task Manager. This is a handy method if you prefer using the keyboard for everything.
Searching for It: Click on the search icon in the taskbar (it looks like a magnifying glass) and type "Task Manager." The application should appear as the top result. Click on it to open it. This is perhaps the most straightforward method for new users.
Once you've opened Task Manager, you might be greeted with a simplified view that only shows the running applications. If that's the case, look for a "More details" button at the bottom of the window. Clicking this will expand Task Manager to show all its tabs and features, giving you access to the full range of performance management tools. Now you are set to analyze the data.
The Task Manager Interface: Understanding the Tabs
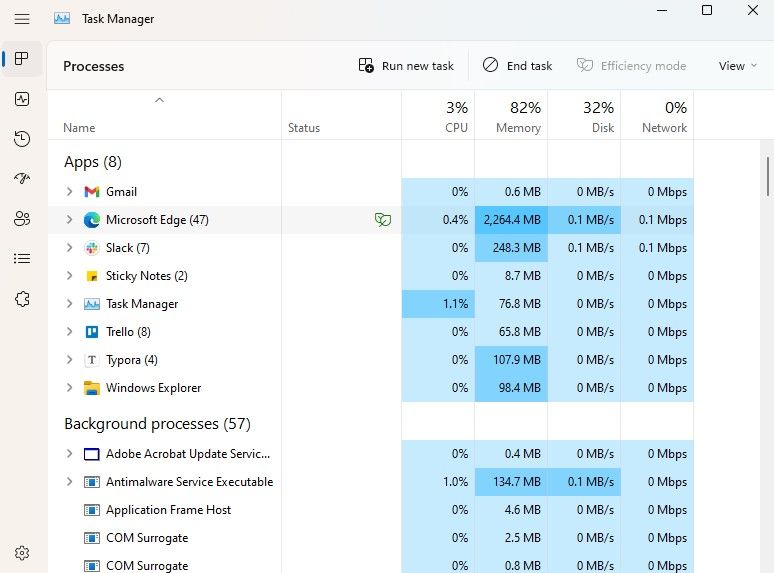
The Task Manager interface in Windows 11 is divided into several tabs, each providing different types of information and controls. Understanding these tabs is crucial for effectively diagnosing and resolving performance issues. Let’s break them down: Processes:This is arguably the most important tab. It shows a list of all the running processes on your system, including applications, background processes, and Windows services. It also displays the resources each process is using, such as CPU, memory, disk, and network. This tab is your go-to place for identifying resource hogs and terminating processes that are causing problems. You can sort the processes by column header to easily find the biggest resource users.Right-clickingon a process offers options to end the task, go to the details, or search online for more information.
Performance: This tab provides a real-time overview of your system's performance. It shows graphs and charts for CPU usage, memory usage, disk activity, network activity, and GPU (graphics processing unit) usage. This tab is useful for identifying overall system bottlenecks. For example, if your CPU usage is consistently at 100%, it indicates that your CPU is overloaded and may be a limiting factor in your system's performance. It also gives you detailed information about your hardware, like the make and model of your CPU and GPU.
App History: This tab tracks the resource usage of Universal Windows Platform (UWP) apps over time. UWP apps are the modern apps you download from the Microsoft Store. This tab is helpful for identifying apps that are consuming excessive resources in the background, even when you're not actively using them. It shows CPU time, network usage, and metered network usage for each app.
Startup Apps: This tab lists the applications that are configured to launch automatically when you start Windows. A large number of startup apps can significantly slow down your boot time. This tab allows you to disable unnecessary startup apps to improve your system's startup performance. It also shows the "Startup impact" for each app, indicating how much it affects your startup time.Disablingan app here doesn't uninstall it; it simply prevents it from launching automatically.
Users: This tab shows a list of all the user accounts that are currently logged in to the system. It displays the resources each user is using, similar to the Processes tab. This is particularly useful on shared computers, where you can identify which user is consuming the most resources.
Details: This tab provides more granular information about the running processes. It shows the process ID (PID), status, user name, CPU time, and other technical details. This tab is primarily used by advanced users for troubleshooting and debugging purposes.
Services: This tab lists all the Windows services that are running on your system. Services are background processes that perform essential system functions. This tab allows you to start, stop, and restart services.However, it's generally not recommended to modify services unless you know what you're doing, as disabling essential services can cause system instability.
By familiarizing yourself with these tabs, you'll be well-equipped to diagnose and resolve performance issues using Task Manager.
Identifying Resource Hogs: Spotting the Culprits
The "Processes" tab in Task Manager is your primary tool for identifying resource hogs – those applications and processes that are consuming an excessive amount of system resources. But how do you actually spot them? Here's a breakdown of what to look for: High CPU Usage:CPU usage is a key indicator of resource consumption. If a process is consistently using a large percentage of your CPU (e.g., 50% or more), it's likely a resource hog.Sortthe Processes tab by the "CPU" column (click on the column header) to quickly identify the processes that are using the most CPU power. Be aware that some processes, like video editing software or games,willnaturally use a lot of CPU when they're actively in use. The problem arises when a process is using a high amount of CPU even when it's supposed to be idle.
High Memory Usage: Memory (RAM) is another critical resource. If your system is constantly running out of memory, it can lead to performance slowdowns as Windows starts using the hard drive as virtual memory (which is much slower).Sortthe Processes tab by the "Memory" column to identify processes that are consuming a lot of RAM. Again, some applications, like web browsers with multiple tabs open, will naturally use a lot of memory. Look for processes that are using significantly more memory than you would expect.
High Disk Usage: Disk activity can also be a performance bottleneck, especially if you're using a traditional hard drive (HDD) instead of a solid-state drive (SSD).Sortthe Processes tab by the "Disk" column to identify processes that are generating a lot of disk activity. This could be due to reading or writing large files, or simply due to excessive logging or temporary file creation.
High Network Usage: If a process is consuming a large amount of network bandwidth, it can slow down your internet connection and affect the performance of other applications that rely on the network.Sortthe Processes tab by the "Network" column to identify processes that are using the most network bandwidth. This could be due to downloading or uploading large files, streaming video, or simply due to background processes that are constantly communicating with the internet.
Once you've identified a potential resource hog, the next step is to investigate further. Right-click on the process and select "Search online" to learn more about it. This can help you determine whether the process is legitimate or potentially malicious. You can also select "End task" to terminate the process and see if it improves your system's performance.Be carefulwhen terminating processes, as ending essential system processes can cause instability. If you're unsure about a process, it's best to do some research before terminating it.
Taking Action: Killing Processes and Optimizing Startup
Now that you've identified some resource hogs, it's time to take action! Task Manager provides several ways to manage processes and optimize your system for better performance.
Ending Tasks: The most direct way to deal with a resource-hogging process is to simply end it.Right-clickon the process in the Processes tab and select "End task." This will terminate the process immediately. This is a useful approach for dealing with applications that have frozen or are consuming excessive resources due to a bug.However, be cautious when ending tasks, as ending essential system processes can cause instability or data loss. Save your work before terminating any process. If you're unsure about a process, it's best to do some research before ending it. Sometimes, a process will immediately restart after you end it. This indicates that it is a service or a component of a larger application.
Disabling Startup Apps: Many applications are configured to launch automatically when you start Windows. This can significantly slow down your boot time and consume system resources in the background, even when you're not actively using the applications. The Startup Apps tab in Task Manager allows you to disable unnecessary startup apps.Simplyselect an app and click the "Disable" button. This will prevent the app from launching automatically when you start Windows. It doesn't uninstall the app; it simply prevents it from running in the background.Considerthe impact of disabling an app before doing so. Some apps, like antivirus software, are essential for system security and should not be disabled.
Adjusting Process Priority (Advanced): For advanced users, Task Manager allows you to adjust the priority of a process. This tells Windows how much CPU time to allocate to the process. Increasing the priority of a process can improve its performance, but it can also negatively affect the performance of other processes.To adjusta process's priority, go to the Details tab, right-click on the process, select "Set priority," and choose a priority level.Be carefulwhen adjusting process priorities, as setting the priority too high for one process can cause instability or slowdowns in other parts of the system. It's generally recommended to only adjust process priorities if you have a specific reason to do so and understand the potential consequences.
Understanding Services: The Services tab lists all the Windows services that are running on your system. While it's generally not recommended to modify services unless you know what you're doing, understanding which services are running and what they do can be helpful for troubleshooting performance issues. You can start, stop, and restart services from this tab. You can also right-click on a service and select "Open Services" to access the Services management console, which provides more detailed information and control over services.Be very cautiouswhen disabling services, as disabling essential services can cause system instability or prevent Windows from functioning correctly.
By using these techniques, you can effectively manage processes, optimize your startup, and improve your overall system performance.
Advanced Techniques: Digging Deeper for Performance
While Task Manager is a powerful tool, it's not a magic bullet. Sometimes, you need to dig deeper to truly optimize your Windows 11 performance. Here are some advanced techniques to consider: Resource Monitor: Resource Monitor is a more detailed performance monitoring tool that is built into Windows. It provides real-time information about CPU usage, memory usage, disk activity, and network activity, similar to Task Manager.However, Resource Monitor provides more granular information and more detailed graphs, allowing you to pinpoint performance bottlenecks with greater precision. To open Resource Monitor, search for it in the Start menu or typeresmonin the Run dialog box.
Performance Analyzer (Windows Performance Toolkit): For serious performance analysis, consider using the Windows Performance Toolkit (WPT). This is a free suite of tools from Microsoft that allows you to record detailed traces of system activity and analyze them to identify performance bottlenecks. WPT is a complex tool that requires some technical expertise to use effectively, but it can provide invaluable insights into your system's performance.
Driver Updates: Outdated or corrupted device drivers can cause a wide range of performance problems. Make sure that your drivers are up to date, especially for your graphics card, network adapter, and storage devices. You can update drivers manually through Device Manager or by downloading the latest drivers from the manufacturer's website.
Disk Defragmentation (for HDDs): If you're using a traditional hard drive (HDD), disk fragmentation can slow down your system's performance. Disk fragmentation occurs when files are scattered across the disk, making it take longer to read and write data. Windows includes a built-in disk defragmentation tool that can help to optimize your hard drive's performance.Note thatyou shouldnotdefragment solid-state drives (SSDs), as it can reduce their lifespan.
Check for Malware: Malware can consume system resources and significantly impact performance. Run a full system scan with your antivirus software to check for malware. Consider using a second opinion scanner, such as Malwarebytes, to catch any malware that your primary antivirus software might have missed.
Clean Up Temporary Files: Windows and applications often create temporary files that can accumulate over time and consume disk space. Use the Disk Cleanup tool to remove temporary files, cached files, and other unnecessary data.
Reinstall Windows (as a Last Resort): If you've tried everything else and your system is still running slowly, consider reinstalling Windows. This will wipe your hard drive and reinstall a fresh copy of Windows, which can often resolve underlying problems that are causing performance issues.Make sure to back upyour important data before reinstalling Windows.
By using these advanced techniques, you can squeeze every last drop of performance out of your Windows 11 system. Remember to approach these techniques with caution and back up your data before making any significant changes.
Maintaining Peak Performance: Preventing Future Issues
Optimizing your Windows 11 performance isn't just a one-time task; it's an ongoing process. To keep your system running smoothly, it's important to adopt some good habits and practices.
Regularly Monitor Task Manager: Make it a habit to open Task Manager periodically to check for resource-hogging processes. This will allow you to identify and address potential performance issues before they become major problems.
Keep Your Software Up to Date: Software updates often include performance improvements and bug fixes. Make sure that you're installing the latest updates for Windows, your applications, and your drivers.
Be Mindful of What You Install: Avoid installing unnecessary software or bloatware. These programs can consume system resources and slow down your system.Only installsoftware from trusted sources and carefully review the installation options to avoid installing unwanted extras.
Uninstall Unused Programs: Regularly review the list of installed programs on your system and uninstall any programs that you no longer use. This will free up disk space and reduce the number of processes running in the background.
Limit Startup Apps: Keep the number of startup apps to a minimum. Disable any unnecessary startup apps to reduce your boot time and free up system resources.
Practice Safe Browsing: Avoid visiting suspicious websites or downloading files from untrusted sources. This will help to prevent malware infections, which can significantly impact performance.
Schedule Regular Maintenance: Schedule regular maintenance tasks, such as disk defragmentation (for HDDs), disk cleanup, and malware scans. This will help to keep your system running smoothly and prevent performance issues.
Consider an SSD: If you're still using a traditional hard drive (HDD), consider upgrading to a solid-state drive (SSD). SSDs offer significantly faster read and write speeds, which can dramatically improve your system's performance.
By following these tips, you can maintain peak performance and keep your Windows 11 system running smoothly for years to come.
In conclusion, using Windows 11 Task Manager is an essential skill for anyone who wants to maintain a fast and efficient computer. From killing resource-hogging processes to optimizing startup apps and monitoring system performance, Task Manager provides a wealth of information and control. Remember, Task Manager is your PC's doctor, ready to diagnose and help you cure what ails your machine. By using the knowledge and techniques outlined in this guide, you can take control of your system, resolve performance issues, and unlock the full potential of your Windows 11 PC.
Now that you're armed with the knowledge to master Task Manager, take some time to explore its features and experiment with different settings. The more you use it, the more comfortable you'll become with its capabilities. And don't be afraid to consult online resources or seek help from tech-savvy friends if you run into any problems.
It's time to put your newfound knowledge into action and reclaim your computer's speed and efficiency! Start by opening Task Manager and identifying any resource-hogging processes that are slowing you down. Disable unnecessary startup apps to reduce your boot time. And regularly monitor your system's performance to catch any potential issues before they become major problems.
Ready to get started? Your Windows 11 PC is waiting to be unleashed! Go forth, optimize, and enjoy a smoother, faster computing experience!
Post a Comment for "Windows 11: How to Use the Task Manager to Improve Performance"
Post a Comment