Windows 11: How to Use the Control Panel
Windows 11 Control Panel: Your Guide to System Mastery
Navigating Windows 11 can feel like exploring a brand-new city – exciting, but also a little overwhelming.Especiallywhen you're trying to tweak system settings, uninstall programs, or manage user accounts. This guide unlocks the secrets of the Control Panel, your go-to hub for deep-diving into Windows 11 and bending it to your will.
Introduction to Windows 11 Control Panel
Okay, friends, let’s talk about the Windows 11 Control Panel. Maybe you've heard whispers of its existence, or maybe you're a seasoned Windows user who remembers when it wastheplace to go foreverything. Now, with the rise of the Settings app, the Control Panel might seem like a dusty relic, but trust us, it's still got plenty of life left in it. Think of it as theold reliabletool chest in your digital garage.
So, what exactlyisthe Control Panel? Simply put, it’s a collection of applets and tools that let you configure almost every aspect of your Windows 11 operating system. From hardware settings to network configurations, user account management to program uninstallation, it’s all in there.
Why do you evenneedthe Control Panel in Windows 11? Well, while Microsoft has been pushing the modern Settings app, some features and granular controls are stillexclusivelyfound within the Control Panel. It's like having a secret menu at your favorite restaurant – you need to know it exists to take advantage of it!
Are you ready to become a Windows 11 Control Panelpro? Let’s dive in and unlock the potential hidden within this powerful tool! You might even surprise yourself with what you can accomplish. Stay with me, and we'll transform you from a Control Panel newbie to a Windows 11master!
Accessing the Windows 11 Control Panel
Alright, first things first:how do we actuallygetto the Control Panel in Windows 11? It's not quite as front-and-center as it used to be, but don't worry, it’s still lurking there, waiting for you.
Using the Search Bar
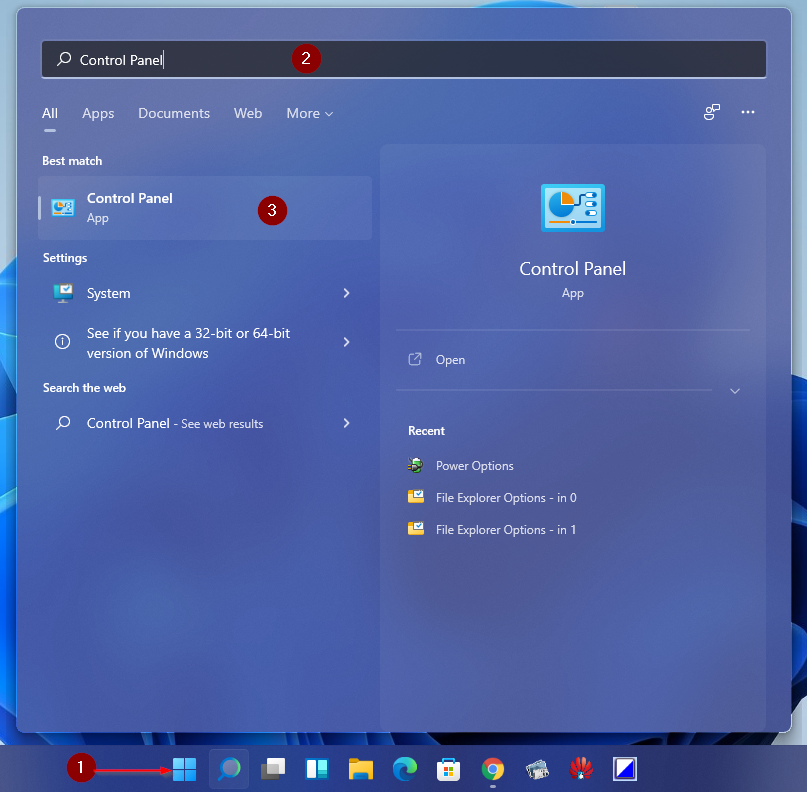
Theeasiestand quickest way to access the Control Panel is by using the search bar located on the taskbar. Simply click on the search icon (it looks like a magnifying glass) or press the Windows key + S. Type "Control Panel" into the search box, and you'll see it appear as the top result. Just click on it, andvoila! The Control Panel opens.
Via the Start Menu
You can also access the Control Panel through the Start menu. Click on the Start button (the Windows logo in the bottom-left corner of your screen), then scroll through the list of apps until you find "Windows Tools". Expand "Windows Tools," and you should see "Control Panel" listed there. Click on it, and you’re in!
Using Run Command
For the keyboard shortcut enthusiasts among us, the Run command is anotherefficientway to open the Control Panel. Press the Windows key + R to open the Run dialog box. Type "control" (without the quotes) into the box and press Enter. The Control Panel will appear instantly.
Creating a Desktop Shortcut
If you find yourself frequently using the Control Panel, you might want to create a desktop shortcut forquickaccess. Here's how:
- Right-click on an empty area of your desktop.
- Select "New" -> "Shortcut".
- In the "Type the location of the item" box, enter "control".
- Click "Next".
- Give the shortcut a name (e.g., "Control Panel") and click "Finish".
Now you have a handy shortcut right on your desktop! No more digging through menus.
No matter which method you choose, accessing the Control Panel in Windows 11 is abreeze. Now that you know how to get there, let's explore what it has to offer!
Navigating the Windows 11 Control Panel Interface
Okay, you've successfully opened the Control Panel! But now what? The interface can seem a bitdauntingat first glance, especially if you're used to the sleek and modern look of the Settings app. Let's break down the Control Panel interface and make it less intimidating.
View Options
The Control Panel offers differentview optionsthat change the way the items are displayed. You can switch between "Category," "Large icons," and "Small icons" views using the "View by" drop-down menu in the top-right corner of the Control Panel window.
Category View: This is the default view, and it groups related settings into categories like "System and Security," "Hardware and Sound," and "Network and Internet." This is a good option if you're not sure exactly where to find a particular setting.
Large Icons View: This view displays all the individual Control Panel items as large icons. It's avisually appealingoption, and it can be helpful if you know the specific item you're looking for.
Small Icons View: Similar to the large icons view, but the icons are smaller, allowing you to see more items at once. This is apracticaloption if you want to quickly scan through all the available settings.
Understanding the Categories
The Category view is often themost user-friendlyway to navigate the Control Panel. Let's take a quick look at some of the key categories: System and Security:This category includes settings related to your computer's security, system information, power options, and backup and restore features.
Network and Internet: Here you'll find settings for managing your network connections, internet options, and sharing settings.
Hardware and Sound: This category covers settings for your printers, sound devices, display settings, and power management.
Programs: Use this category to uninstall programs, manage default programs, and control Windows features.
User Accounts: This is where you can manage user accounts, change passwords, and configure parental controls.
Appearance and Personalization: Customize the look and feel of your desktop, taskbar, and other Windows elements.
Ease of Access: Configure settings to make your computer easier to use if you have a disability.
Clock and Region: Change the date, time, and regional settings of your computer.
Using the Search Bar (Within the Control Panel)
Just like the Windows search bar, the Control Panel has its own search bar located in the top-right corner. If you know the name of the setting you're looking for, you can type it into the search box, and the Control Panel will filter the results to show you the relevant items. This is ahuge time-saverwhen you're trying to find something specific.
With aclear understandingof the Control Panel interface and its navigation options, you're now well-equipped to explore its vast array of settings and customize your Windows 11 experience to your liking. Let's move on to somepracticalexamples of how to use the Control Panel to solve common problems and tweak your system.
Essential Windows 11 Control Panel Tasks
Now that you knowhowto get around the Control Panel, let's talk aboutwhatyou can actuallydowith it. Here are some essential tasks that you can perform using the Control Panel in Windows 11:
Uninstalling Programs
One of themost commonuses for the Control Panel is uninstalling programs. Sometimes apps just don't want to leave, or they leave behind annoying traces. The Control Panel offers a reliable way to remove them.
- Open the Control Panel and go to "Programs" -> "Programs and Features".
- A list of installed programs will appear.
- Select the program you want to uninstall.
- Click the "Uninstall" button at the top of the list.
- Follow the on-screen instructions to complete the uninstallation process.
Pro Tip: If you're having trouble uninstalling a program, you can try using a dedicated uninstaller tool like Revo Uninstaller.
Managing User Accounts
The Control Panel allows you to manage user accounts on your computer. You can create new accounts, change account types, and manage passwords.
- Open the Control Panel and go to "User Accounts" -> "User Accounts".
- From here, you can: Change your account name or picture.
Change your password.
Manage another account.
Change User Account Control settings.
Security Note: It'scrucialto use strong passwords and enable two-factor authentication whenever possible to protect your accounts.
Configuring Hardware Devices
The Control Panel is your go-to place for configuring hardware devices connected to your computer, such as printers, mice, and keyboards.
- Open the Control Panel and go to "Hardware and Sound" -> "Devices and Printers".
- You'll see a list of all connected devices.
- Right-click on a device to access its settings and properties.
Example: If your printer isn't working properly, you can troubleshoot it from here, update drivers, or set it as the default printer.
Adjusting Power Options
The Control Panel lets you adjust power options to optimize battery life on laptops or reduce energy consumption on desktops.
- Open the Control Panel and go to "Hardware and Sound" -> "Power Options".
- You can choose from different power plans (e.g., Balanced, Power saver, High performance) or create your own custom plan.
- Click "Change plan settings" to customize the settings for each plan, such as how long the display should stay on or when the computer should go to sleep.
Configuring Network Settings
The Control Panel provides access to network settings, allowing you to configure your internet connection, troubleshoot network problems, and manage network adapters.
- Open the Control Panel and go to "Network and Internet" -> "Network and Sharing Center".
- From here, you can: View your network status.
Troubleshoot network problems.
Change adapter settings.
Set up a new connection or network.
These are just a fewexamplesof the many tasks you can perform using the Control Panel in Windows 11. By mastering these essential tasks, you'll be able totake controlof your system and customize it to meet your specific needs. Let's move on to more advanced topics and explore some of thehidden gemswithin the Control Panel.
Advanced Control Panel Features in Windows 11
Ready tolevel upyour Control Panel game? Let's explore some advanced features that can help you fine-tune your Windows 11 experience.
System Configuration (msconfig)
The System Configuration tool (msconfig) allows you to manage startup programs, boot options, and services. This can beincredibly usefulfor troubleshooting performance issues or optimizing your system's startup time.
- Press the Windows key + R to open the Run dialog box.
- Type "msconfig" (without the quotes) and press Enter.
- In the System Configuration window, you'll find several tabs: General:Allows you to choose between normal startup, diagnostic startup, and selective startup.
Boot: Configure boot options, such as Safe Mode, boot timeout, and operating system selection.
Services: Manage Windows services, including disabling unnecessary services to improve performance.
Startup: Manage startup programs (though Windows 10/11 primarily uses Task Manager for this now).
Tools: Provides access to various system tools, such as System Information and Disk Cleanup.
Caution: Becarefulwhen disabling services, as disabling essential services can cause system instability. Only disable services if you know what they do.
Disk Management
The Disk Management tool allows you to manage your hard drives and partitions. You can create new partitions, format drives, change drive letters, and shrink or extend existing partitions.
- Open the Control Panel and go to "System and Security" -> "Administrative Tools".
- Double-click on "Computer Management".
- In the Computer Management window, select "Disk Management" from the left-hand pane.
Warning:Improper useof Disk Management can lead to data loss. Always back up your data before making any changes to your hard drives or partitions.
Event Viewer
The Event Viewer allows you to view system logs and troubleshoot problems. It records events related to hardware, software, and security.
- Open the Control Panel and go to "System and Security" -> "Administrative Tools".
- Double-click on "Event Viewer".
- In the Event Viewer window, you can browse different logs, such as: Application:Records events related to applications.
Security: Records security-related events, such as logon attempts.
System: Records events related to the Windows operating system.
Tip: Use the Event Viewer todiagnosesystem crashes, application errors, and other problems.
Task Scheduler
The Task Scheduler allows you to automate tasks by scheduling them to run at specific times or in response to specific events.
- Open the Control Panel and go to "System and Security" -> "Administrative Tools".
- Double-click on "Task Scheduler".
- In the Task Scheduler window, you can create new tasks, import tasks, and manage existing tasks.
Example: You can use the Task Scheduler to automatically run a backup program every night or to defragment your hard drive on a weekly basis.
These advanced Control Panel features cansignificantly enhanceyour ability to manage and troubleshoot your Windows 11 system. By mastering these tools, you'll be able totake full controlof your computer and optimize it for your specific needs.
Control Panel vs. Settings App: What's the Difference?
Okay, so you've been hearing a lot about the Control Panel and the Settings app in Windows 11. But what's therealdifference between them, and which one should you use?
Evolution of Windows Settings
The Settings app is Microsoft'smodernapproach to system configuration. It was first introduced in Windows 8 as a simplified alternative to the Control Panel, and it has been evolving ever since. In Windows 11, the Settings app is designed to be theprimaryinterface for managing your system.
Key Differences
Here's a breakdown of thekey differencesbetween the Control Panel and the Settings app: Interface: The Settings app has amodern, touch-friendly interface, while the Control Panel has a more traditional, desktop-oriented interface.
Features: The Settings app provides access tomostof the common system settings, but some advanced settings are stillexclusivelyfound in the Control Panel.
Organization: The Settings app organizes settings into broad categories, while the Control Panel uses a more granular, applet-based approach.
Search: Both the Settings app and the Control Panel have search functionality, but the Settings app's search is generally considered to bemore efficient.
When to Use Which
So, when should you use the Control Panel, and when should you use the Settings app? Here's a general guideline: Use the Settings app for:
Basic system configuration tasks, such as changing display settings, managing user accounts, and configuring network connections.
Tasks that are commonly performed on touch-screen devices.
When you prefer a modern, user-friendly interface.
Use the Control Panel for:
Advanced system configuration tasks, such as managing hardware devices, configuring power options, and troubleshooting system problems.
Tasks that require granular control over system settings.
When you're familiar with the traditional Windows interface.
In Reality: You'll likely useboth! Microsoft is slowly migrating functionality from the Control Panel to the Settings app, but the Control Panel is still avaluable toolfor many tasks.
The Control Panel and the Settings app arecomplementary toolsthat provide different approaches to system configuration. By understanding the differences between them, you can choose theright toolfor the job andmaximizeyour productivity.
Tips and Tricks for Using the Windows 11 Control Panel Effectively
Now that you're a Control Panelexpert, let's share sometips and tricksto help you use it even more effectively.
Pinning Control Panel Items to the Start Menu or Taskbar
Forquick accessto frequently used Control Panel items, you can pin them to the Start menu or taskbar.
- Open the Control Panel.
- Right-click on the Control Panel item you want to pin.
- Select "Pin to Start" or "Pin to taskbar".
Creating Custom Control Panel Shortcuts
You can create custom shortcuts to specific Control Panel items and place them on your desktop or in other convenient locations.
- Right-click on an empty area of your desktop.
- Select "New" -> "Shortcut".
- In the "Type the location of the item" box, enter the command for the Control Panel item you want to access. For example, to create a shortcut to the "Power Options" control panel, enter "control powercfg.cpl". You can find a list of these commands online.
- Click "Next".
- Give the shortcut a name and click "Finish".
Using Command-Line Arguments
You can use command-line arguments to open specific Control Panel items directly from the command prompt or Power Shell. This can be useful for automating tasks or creating scripts.
- Open the Command Prompt or Power Shell.
- Type "control" followed by the command-line argument for the Control Panel item you want to open. For example, to open the "System" control panel, type "control system".
Exploring Hidden Control Panel Items
Some Control Panel items are hidden by default. To access these hidden items, you can use the "God Mode" trick.
- Create a new folder on your desktop.
- Rename the folder to: `God Mode.{ED7BA470-8E54-465E-825C-99712043E01C}`
- The folder icon will change to a Control Panel icon.
- Double-click on the folder to open the "God Mode" window, which contains a comprehensive list of all Control Panel items.
Note: The "God Mode" trick is aconvenientway to access all Control Panel items in one place, but it's not officially supported by Microsoft.
By using these tips and tricks, you canstreamlineyour Control Panel experience andtake full advantageof its capabilities.
Troubleshooting Common Control Panel Issues
Even with all the knowledge you've gained, you might still encounteroccasional issueswith the Control Panel. Here are some common problems and how to troubleshoot them:
Control Panel Not Opening
If the Control Panel refuses to open, try these solutions:
2.Check for system file corruption: Open the Command Prompt as an administrator and run the command `sfc /scannow`. This will scan for and repair corrupted system files.
3.Run a virus scan: Malware can sometimes interfere with the Control Panel.
4.Create a new user account: Sometimes, user profile corruption can cause problems with the Control Panel.
Missing Control Panel Items
If you're missing certain Control Panel items, try these solutions:
1.Check the View by setting: Make sure you're viewing the Control Panel in "Large icons" or "Small icons" view, as some items may not be visible in "Category" view.
2.Enable hidden Control Panel items: Use the "God Mode" trick to access hidden items.
3.Reinstall Windows: If all else fails, you may need to reinstall Windows to restore missing Control Panel items.
Control Panel Freezing or Crashing
If the Control Panel freezes or crashes, try these solutions:
1.Close unnecessary programs: Running too many programs at once can sometimes cause the Control Panel to freeze.
2.Update your drivers: Outdated or corrupt drivers can sometimes cause system instability.
3.Run a memory test: Faulty memory can cause the Control Panel to crash.
4.Check for hardware problems: Hardware problems, such as a failing hard drive, can also cause the Control Panel to crash.
By following these troubleshooting steps, you canresolve most common Control Panel issuesand keep your system running smoothly.
In conclusion, the Windows 11 Control Panel, while a legacy component, continues to be a powerful and essential tool for system management. Grasping its functionalities ensures users can maintain, customize, and troubleshoot their systems effectively.
The Control Panel in Windows 11 remains a valuable asset, despite the prominence of the modern Settings app. It offers granular control over system settings, enabling users to manage hardware, user accounts, network configurations, and more. Knowing how to navigate and utilize the Control Panel can significantly enhance a user's ability to customize their Windows 11 experience to meet specific needs and preferences.
Now that you've unlocked the secrets of the Windows 11 Control Panel, put your newfound knowledge to the test! Try customizing your power options, managing your user accounts, or exploring some of the advanced features we discussed. What specific task are you most excited to tackle with your Control Panel expertise?
Post a Comment for "Windows 11: How to Use the Control Panel"
Post a Comment