Linux System Administration: Managing Disk Space and File Systems
Linux Disk Space Mastery: A System Admin's Guide to File System Management
Hey there, fellow tech enthusiasts! Ever felt like your Linux server is a digital hoarder, stuffing its metaphorical closet (the disk space) with who-knows-what, until you get that dreaded "Disk full" error? We've all been there. It's like trying to find your keys in a teenager's room – a chaotic, frustrating mess. And just like that room, your Linux file system needs regular cleaning and organization to run smoothly.
Imagine this: you're about to deploy that critical application, the one that will finally automate your coffee delivery (because, priorities!), only to be greeted by the digital equivalent of a grumpy landlord: "Insufficient disk space!" Suddenly, your dreams of caffeine-fueled productivity are dashed against the harsh rocks of reality. Or, picture your database server slowing to a crawl because it's running out of room to breathe, making your users think your website is powered by hamsters on tiny treadmills. Not a great look, right?
The truth is, managing disk space and file systems in Linux is a critical skill for any system administrator, developer, or anyone who relies on a Linux-based system. It's not just about avoiding annoying error messages; it's about ensuring system stability, optimizing performance, and preventing data loss. Think of it as the digital equivalent of good housekeeping – essential for a healthy and happy server.
Now, you might be thinking, "Okay, I get it. Disk space is important. But where do I even start?" That's where this guide comes in. We're going to dive deep into the world of Linux file systems, explore the tools and techniques you need to keep your disks lean and mean, and arm you with the knowledge to conquer even the most cluttered server. We'll cover everything from understanding different file system types to using command-line tools for monitoring disk usage, managing partitions, and implementing quotas. We'll even touch on some more advanced topics like LVM (Logical Volume Management) for flexible storage management.
But before you start picturing yourself as a Linux guru, fear not! We'll break down everything into easy-to-understand steps, with plenty of real-world examples and practical tips along the way. We'll even throw in a few jokes to keep things interesting (because who says system administration can't be fun?).
So, are you ready to unlock the secrets of Linux disk space mastery? To transform your cluttered server into a well-oiled, high-performing machine? Then buckle up, grab your favorite beverage (coffee recommended, naturally), and let's dive in!
Understanding the Linux File System
Before we start slinging commands and partitioning disks, let's take a moment to understand the foundation upon which everything else is built: the Linux file system. It's more than just a place to store your files; it's a hierarchical structure that organizes all the data on your system, from your operating system kernel to your cat videos.
• The File System Hierarchy: Your Server's Organizational Chart
Think of the Linux file system as a tree. The root directory, represented by a single slash ("/"), is the trunk. All other directories branch out from the root, creating a hierarchical structure. Each directory serves a specific purpose, and understanding this structure is crucial for navigating your system effectively.
- / (Root): The top-level directory, containing all other directories and files. Everything starts here.
- /bin: Essential user command binaries (e.g., ls, cp, mv). These are commands that all users need to access.
- /boot: Files required to boot the system, including the kernel and bootloader. Messing with this directory can prevent your system from starting.
- /dev: Device files, representing hardware devices like hard drives, printers, and network interfaces.
- /etc: System-wide configuration files. This is where you'll find settings for your network, users, and services.
- /home: Home directories for each user on the system. This is where users store their personal files and settings.
- /lib: Essential shared libraries required by programs in /bin and /sbin.
- /media: Mount point for removable media, such as USB drives and CDs.
- /mnt: Temporary mount point for file systems.
- /opt: Optional application software packages.
- /proc: A virtual file system containing information about running processes and kernel parameters.
- /root: The home directory for the root user.
- /sbin: System administration binaries (e.g., ifconfig, fdisk). These are commands that only administrators typically use.
- /tmp: Temporary files. Files in this directory are often deleted on reboot.
- /usr: User-related programs and data, including binaries, libraries, documentation, and source code.
- /var: Variable data, such as logs, databases, and website content. This directory is expected to grow over time.
Understanding this hierarchy is like knowing the layout of your own house. You know where to find things, and you can navigate quickly and efficiently.
• File System Types: Choosing the Right Tool for the Job
Not all file systems are created equal. Different file systems have different strengths and weaknesses, and choosing the right one for your needs is important. Here are a few of the most common file system types in Linux:
- ext4: The most common and generally recommended file system for Linux. It's a robust, reliable, and feature-rich file system that offers good performance and supports large file sizes. Think of it as the "all-purpose" file system.
- XFS: A high-performance file system often used for large storage arrays and servers. It's known for its scalability and reliability, making it a good choice for demanding applications.
- Btrfs: A modern file system that offers advanced features like snapshots, copy-on-write, and built-in volume management. It's a good choice for users who want to take advantage of these advanced features.
- NTFS: The standard file system for Windows. Linux can read and write to NTFS partitions, but performance may not be as good as with native Linux file systems.
- FAT32: An older file system that's widely supported by different operating systems. However, it has limitations on file size (4GB maximum) and partition size.
Choosing the right file system is like choosing the right tool for a job. You wouldn't use a hammer to screw in a screw, and you wouldn't use FAT32 for a large database server. Consider your needs and choose the file system that best suits them.
• Disk Partitioning: Dividing and Conquering Your Storage
Before you can create a file system, you need to partition your disk. Partitioning divides your physical disk into logical sections, each of which can be formatted with a different file system. This allows you to organize your storage and allocate space to different purposes.
Think of partitioning as dividing your garden into different plots. You might have one plot for vegetables, one for flowers, and one for herbs. Each plot is a separate area with its own purpose. Similarly, you can partition your disk to have one partition for your operating system, one for your user data, and one for your swap space.
Common partitioning schemes include:
- MBR (Master Boot Record): An older partitioning scheme that supports up to four primary partitions or three primary partitions and one extended partition. MBR partitions are limited to 2TB in size.
- GPT (GUID Partition Table): A newer partitioning scheme that supports up to 128 partitions and allows for partitions larger than 2TB. GPT is the recommended partitioning scheme for modern systems.
Understanding disk partitioning is like understanding the foundations of your house. You need to have a solid foundation before you can build anything on top of it.
Now that we have a solid understanding of the Linux file system, let's move on to the exciting part: managing disk space!
Managing Disk Space: Keeping Your Server Lean and Mean
Okay, friends, let's get our hands dirty and explore the tools and techniques you can use to keep your Linux server's disk space under control. This is where we transform from passive observers into active participants in the fight against digital clutter.
• Monitoring Disk Usage: Knowing Where Your Space Is Going
The first step in managing disk space is to know where your space is being used. You can't fix a problem if you don't know what it is, right? Thankfully, Linux provides several powerful command-line tools for monitoring disk usage.
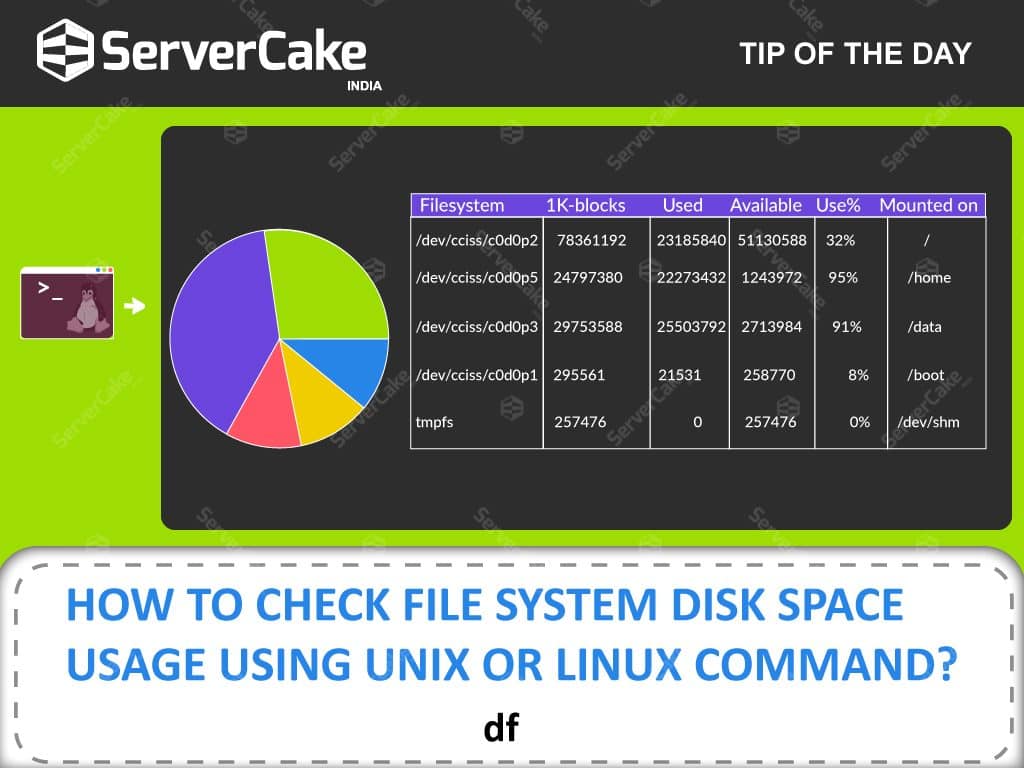
- df (Disk Free): This command displays the amount of disk space available on each mounted file system. It's a quick and easy way to get an overview of your disk usage.
- Use the `-h` option for human-readable output (e.g., "10G" instead of "10485760").
- Example: `df -h`
- du (Disk Usage): This command displays the amount of disk space used by a specified directory or file. It's useful for identifying which directories are consuming the most space.
- Use the `-h` option for human-readable output.
- Use the `-s` option to display only the total size of a directory.
- Use the `-c` option to display a grand total.
- Example: `du -sh /var/log` (shows the total size of the /var/log directory)
- ncdu (NCurses Disk Usage): An interactive disk usage analyzer that allows you to navigate your file system and identify large files and directories. It's a great alternative to `du` for visually exploring your disk usage.
- You may need to install `ncdu` first using your distribution's package manager (e.g., `apt install ncdu` on Debian/Ubuntu, `yum install ncdu` on Cent OS/RHEL).
- Example: `ncdu /` (starts ncdu in the root directory)
These tools are your best friends when it comes to tracking down disk space hogs. Use them regularly to keep an eye on your disk usage and identify potential problems before they become critical.
• Cleaning Up Unnecessary Files: Tidying Up Your Digital Space
Once you've identified the files and directories that are consuming the most space, it's time to start cleaning up. This involves removing unnecessary files, compressing large files, and generally tidying up your digital space.
- Removing Temporary Files: Temporary files can accumulate over time and consume a significant amount of disk space. Regularly clean up the `/tmp` directory and any other directories where temporary files are stored.
- You can use the `find` command to locate temporary files based on their age.
- Example: `find /tmp -type f -atime +7 -delete` (deletes files in /tmp that haven't been accessed in the last 7 days)
- Removing Old Log Files: Log files can grow rapidly, especially on busy servers. Implement a log rotation policy to automatically archive and delete old log files.
- The `logrotate` utility is commonly used for log rotation.
- Configuration files for `logrotate` are typically located in `/etc/logrotate.d/`.
- Removing Duplicate Files: Duplicate files can waste a significant amount of disk space. Use a tool like `fdupes` to identify and remove duplicate files.
- You may need to install `fdupes` first using your distribution's package manager.
- Example: `fdupes -r /home/user/Documents` (finds duplicate files in the /home/user/Documents directory)
- Compressing Large Files: Compressing large files can significantly reduce their size, freeing up disk space. Use tools like `gzip` or `bzip2` to compress files that are not frequently accessed.
- Example: `gzip filename.txt` (compresses filename.txt into filename.txt.gz)
Cleaning up unnecessary files is like decluttering your house. It makes it easier to find what you need and frees up valuable space.
• Managing File Systems: Resizing and Repairing
Sometimes, simply cleaning up files isn't enough. You may need to resize your file systems or repair damaged file systems to ensure optimal performance and prevent data loss.
- Resizing File Systems: If a file system is running out of space, you can resize it to allocate more space from the underlying partition or logical volume.
- Use tools like `resize2fs` for ext4 file systems, `xfs_growfs` for XFS file systems, and `btrfs filesystem resize` for Btrfs file systems.
- You may need to unmount the file system before resizing it.
- Checking and Repairing File Systems: File system corruption can lead to data loss and system instability. Regularly check your file systems for errors and repair them if necessary.
- Use the `fsck` command to check and repair file systems.
- You may need to unmount the file system before checking it.
- Example: `fsck /dev/sda1` (checks and repairs the file system on /dev/sda1)
Managing file systems is like maintaining your car. Regular maintenance can prevent breakdowns and ensure that your car runs smoothly for years to come.
Logical Volume Management (LVM): Flexible Storage Management
For those of you who want even more control over your storage, Logical Volume Management (LVM) is your superpower. LVM allows you to create logical volumes that span multiple physical disks, resize them dynamically, and take snapshots of your data. It's like having a flexible container that can grow and shrink as needed.
• Understanding LVM Concepts: Building Blocks of Flexible Storage
Before we dive into the commands, let's understand the basic concepts of LVM:
- Physical Volumes (PVs): These are the physical disks or partitions that are used by LVM.
- Volume Groups (VGs): A VG is a collection of PVs that are treated as a single storage pool.
- Logical Volumes (LVs): LVs are virtual partitions that are created within a VG. They can be resized and moved dynamically.
Think of it like this: PVs are the individual bricks, VGs are the walls built from those bricks, and LVs are the rooms within those walls. You can add more bricks to the walls, and you can rearrange the rooms as needed.
• Creating and Managing LVM Volumes: Putting LVM into Action
Here's a basic overview of how to create and manage LVM volumes:
- Create Physical Volumes: Use the `pvcreate` command to initialize physical volumes.
- Example: `pvcreate /dev/sda1 /dev/sdb1`
- Create a Volume Group: Use the `vgcreate` command to create a volume group.
- Example: `vgcreate myvg /dev/sda1 /dev/sdb1`
- Create Logical Volumes: Use the `lvcreate` command to create logical volumes within a volume group.
- Example: `lvcreate -L 10G -n mylv myvg` (creates a 10GB logical volume named mylv in the myvg volume group)
- Resize Logical Volumes: Use the `lvextend` command to increase the size of a logical volume and `lvreduce` to decrease it (carefully!).
- Example: `lvextend -L +5G /dev/myvg/mylv` (extends the mylv logical volume by 5GB)
LVM is a powerful tool for managing storage in a flexible and efficient way. It's a bit more complex than traditional partitioning, but the benefits are well worth the effort for many users.
Disk Quotas: Preventing Runaway Disk Usage
Imagine you have a shared server with multiple users. One user starts filling up the entire disk with their personal projects, leaving no space for others. This is where disk quotas come to the rescue! Disk quotas allow you to limit the amount of disk space that individual users or groups can use, preventing one user from hogging all the resources.
• Setting Up Disk Quotas: Limiting User and Group Usage
Here's how you can set up disk quotas on your Linux system:
- Install the Quota Tools: You may need to install the quota tools using your distribution's package manager (e.g., `apt install quota` on Debian/Ubuntu, `yum install quota` on Cent OS/RHEL).
- Enable Quotas in /etc/fstab: Edit the `/etc/fstab` file and add the `usrquota` and `grpquota` options to the file system you want to enable quotas on.
- Example: `/dev/sda1 /home ext4 defaults,usrquota,grpquota 0 2`
- Remount the File System: Remount the file system to activate the quota options.
- Example: `mount -o remount /home`
- Run quotacheck: Use the `quotacheck` command to create or update the quota database.
- Example: `quotacheck -uvgm /home`
- Edit Quotas with edquota: Use the `edquota` command to edit the quotas for individual users or groups.
- Example: `edquota -u username` (edits the quota for the user "username")
- Enable Quotas with quotaon: Use the `quotaon` command to enable quotas.
- Example: `quotaon -uvgm /home`
Disk quotas are a valuable tool for managing disk space in multi-user environments. They ensure that everyone has fair access to resources and prevent one user from monopolizing the entire disk.
Troubleshooting Disk Space Issues
Even with the best planning and management, disk space issues can still arise. Here's a quick guide to troubleshooting common problems:
• Identifying Common Problems: What's Eating My Disk Space?
- Runaway Log Files: Check `/var/log` for excessively large log files. Use `logrotate` to manage log file sizes.
- Temporary Files: Ensure that `/tmp` and other temporary directories are being cleaned up regularly.
- Large User Directories: Use `du -sh /home/` to identify users who are consuming a lot of space.
- Unnecessary Software: Remove any software that is no longer needed.
- Orphaned Files: Files that are no longer associated with any program can accumulate over time. Use a tool like `deborphan` (on Debian/Ubuntu) to identify and remove orphaned packages.
• Resolving Disk Space Problems: Taking Action
- Increase Disk Space: If possible, add more disk space to your server.
- Resize Partitions/Logical Volumes: Use `resize2fs`, `xfs_growfs`, or LVM tools to resize partitions or logical volumes.
- Move Data to External Storage: Move less frequently accessed data to external storage.
- Archive Data: Archive old data to free up space on your primary storage.
- Implement Quotas: Use disk quotas to limit user and group disk usage.
Troubleshooting disk space issues is like being a detective. You need to gather clues, analyze the evidence, and take action to solve the mystery.
Frequently Asked Questions
Let's tackle some frequently asked questions about Linux disk space management:
Question 1: How do I check the disk space usage of a specific directory?
Answer: You can use the `du -sh` command followed by the directory path. For example, `du -sh /var/log` will show the total size of the `/var/log` directory in a human-readable format.
Question 2: How do I find the largest files on my system?
Answer: You can use the following command: `find / -type f -printf '%s %p\n'
| sort -nr | head -n 10`. This command will find all files on the system, print their size and path, sort them by size in descending order, and display the top 10 largest files. |
|---|
Question 3: What is the difference between `df` and `du`?
Answer: `df` shows the amount of disk space available on each mounted file system, while `du` shows the amount of disk space used by a specified directory or file. `df` is useful for getting an overview of your disk usage, while `du` is useful for identifying which directories are consuming the most space.
Question 4: How do I extend a logical volume using LVM?
Answer: First, extend the physical volume (if necessary) using `pvresize`. Then, extend the logical volume using `lvextend -L +
And there you have it! A comprehensive guide to managing disk space and file systems in Linux. Now go forth and conquer your digital clutter!
So, there you have it, friends! We've journeyed through the labyrinthine world of Linux file systems, armed ourselves with powerful command-line tools, and learned how to tame even the most unruly disk space hogs. We've covered everything from understanding the file system hierarchy to implementing LVM for flexible storage management. We've even delved into the art of setting up disk quotas to prevent digital hoarding.
But knowledge is only power when it's put into action. Now it's your turn to take the reins and apply what you've learned to your own Linux systems. Start by running `df -h` and `du -sh /var/log` to get a snapshot of your current disk usage. Identify potential problem areas and start cleaning up unnecessary files, compressing large files, and implementing log rotation policies. If you're feeling adventurous, explore the world of LVM and create a flexible storage solution that meets your needs.
But don't stop there! Continuously monitor your disk usage, refine your management strategies, and stay up-to-date with the latest tools and techniques. The world of Linux is constantly evolving, and there's always something new to learn.
Now, here's your call to action: Schedule a 30-minute "disk space audit" for your most critical Linux server this week. Use the tools and techniques we've discussed to identify and address any potential disk space issues. Your future self (and your users) will thank you!
Remember, managing disk space and file systems is an ongoing process, not a one-time task. By staying vigilant and proactive, you can ensure the stability, performance, and longevity of your Linux systems. Keep learning, keep experimenting, and never be afraid to ask questions. After all, we're all in this together!
So, what are you waiting for? Go forth and conquer your digital clutter! And hey, while you're at it, maybe consider automating that coffee delivery system. You deserve it. What are your biggest disk space challenges right now?
Post a Comment for "Linux System Administration: Managing Disk Space and File Systems"
Post a Comment