Linux System Administration: Managing Disk Space and File Systems
Taming the Digital Jungle: A Linux Admin's Guide to Disk Space Domination
Linux system administrators, breathe easy! This guide helps navigate the often-treacherous terrain of disk space management and file systems, providing the knowledge to reclaim storage and optimize system performance. Ever feel like your Linux server is a digital hoarder, inexplicably filling up withstuff? You're not alone. One day, everything's humming along nicely, and the next, you're getting cryptic "disk full" errors. It's like your system's silently protesting, "I'm full! No more cat pictures!" This usually happens at the most inconvenient time, like during a crucial system update or, even worse, in the middle of the night when the on-call pager starts screaming. And let's be honest, figuring out where all that space went can feel like searching for a dropped contact lens in a haystack. You start poking around with commands you only vaguely remember from that one time you Googled "Linux disk space issues at 3 AM," hoping you don't accidentally delete anything important. It's a chaotic dance of desperation and crossed fingers. But fear not, fellow sysadmins! This guide is designed to be your trusty sidekick in the battle against runaway disk usage. We'll explore the tools and techniques you need to identify space hogs, understand different file systems, and implement strategies to keep your Linux systems lean, mean, and performing optimally. Think of it as your crash course in digital decluttering, but for servers. Ready to transform from a disk space desperado to a storage samurai? Let's dive in!
Understanding Disk Space Usage in Linux
Monitoring Disk Space with df and du
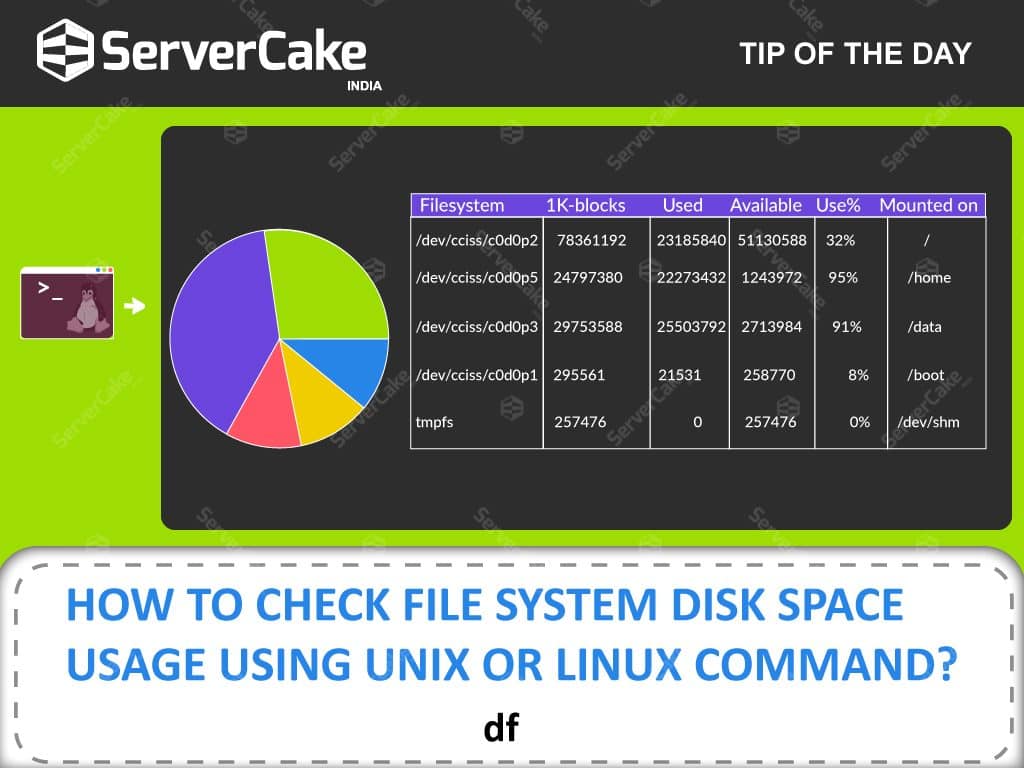
One of the first steps in effectively managing disk space is understanding how to monitor it. The `df` and `du` commands are your best friends here. `df` (disk free) shows you the overall disk space usage on your system, including mounted file systems. Think of it as a bird's-eye view of your storage landscape. It displays information like total disk space, used space, available space, and the mount point of each file system. A common usage is `df -h`, where the `-h` option makes the output human-readable (e.g., showing sizes in GB or MB instead of kilobytes). This provides a quick snapshot of which partitions are nearing capacity. For example, you might see that `/var/log` is filling up, indicating a potential issue with excessive logging.
On the other hand, `du` (disk usage) is like getting down on the ground and inspecting individual directories and files. It estimates file space usage. It's perfect for pinpointing where the bulk of your data is located. For instance, running `du -sh` in a directory will show the size of each subdirectory and file within it, sorted by size. The `-s` option provides a summary, showing only the total size of each directory, and `-h` again makes it human-readable. By combining `df` and `du`, you can get a comprehensive understanding of your disk space situation. `df` tells youifyou have a problem, and `du` helps you figure outwherethe problem is. Mastering these two commands is essential for proactive disk space management.
Common Culprits of Disk Space Overload
So, what exactly eats up all that precious disk space? Several common culprits are often responsible. Log files, for example, can grow exponentially, especially if your system is experiencing errors or verbose logging is enabled. Many services, like web servers and databases, generate substantial log files that, if left unchecked, can quickly consume significant storage. Another major offender is temporary files. Applications often create temporary files for various purposes, and sometimes these files are not properly cleaned up after use. This can lead to a gradual accumulation of orphaned temporary files cluttering your system.
Furthermore, backups, especially uncompressed ones, can take up a considerable amount of space. If you're not careful with your backup strategy, you might end up storing multiple copies of large datasets, quickly filling up your available storage. Old kernels can also contribute to disk space waste. Each time you update your kernel, the old one is often kept as a backup in case something goes wrong. Over time, these old kernels can accumulate and take up valuable space. Finally, user files, particularly large media files or downloads, can easily consume significant disk space, especially in multi-user environments. Regularly monitoring and addressing these potential sources of disk space overload is crucial for maintaining a healthy and efficient Linux system. Knowing what to look for is half the battle!
Managing File Systems in Linux
Understanding File System Types (ext4, XFS, Btrfs)
Linux offers a variety of file systems, each with its own strengths and weaknesses. Choosing the right file system is crucial for performance, reliability, and features. Ext4 (Fourth Extended Filesystem) is arguably the most widely used and the default for many Linux distributions. It's a solid, reliable choice that offers good performance for general-purpose workloads. Ext4 supports large file sizes and volumes, journaling for data integrity, and is well-suited for desktops, servers, and embedded systems. Think of it as the trusty pickup truck of file systems – dependable and versatile.
XFS (originally SGI Extended Filesystem) is another popular option, particularly well-suited for large files and high-performance environments. XFS is known for its excellent scalability and performance when dealing with large files, making it a good choice for servers that handle video editing, databases, or scientific computing. It uses delayed allocation and extent-based allocation to optimize file storage and retrieval. Imagine XFS as a powerful sports car – designed for speed and handling large workloads.
Btrfs (B-tree file system) is a more modern file system that offers advanced features like snapshots, subvolumes, and built-in RAID support. Snapshots allow you to create point-in-time copies of your file system, which can be invaluable for data recovery. Subvolumes provide a way to logically partition your file system, allowing you to manage different parts of your storage independently. Btrfs also supports online defragmentation and compression, which can help optimize disk space usage. Consider Btrfs as a feature-rich Swiss Army knife – versatile but potentially more complex to configure. The choice of file system depends on your specific needs and priorities. Understanding the characteristics of each option allows you to make informed decisions about how to best organize and manage your data.
Mounting and Unmounting File Systems
Mounting and unmounting file systems are fundamental tasks in Linux system administration. Mounting a file system makes it accessible to the system, while unmounting detaches it. The `mount` command is used to attach a file system to a specific directory (mount point) in the file system hierarchy. For example, `mount /dev/sdb1 /mnt/data` would mount the first partition on the second hard drive (`/dev/sdb1`) to the `/mnt/data` directory.
Before mounting, you need to create the mount point directory if it doesn't already exist (e.g., `mkdir /mnt/data`). To make the mount permanent, you can add an entry to the `/etc/fstab` file. This file contains information about file systems and how they should be mounted at boot time. Each entry specifies the device, mount point, file system type, mount options, and dump/fsck order. It'scrucialto edit `/etc/fstab` carefully, as errors can prevent the system from booting properly.
Unmounting a file system is done using the `umount` command. For example, `umount /mnt/data` would unmount the file system from the `/mnt/data` directory. Before unmounting, ensure that no processes are currently using the file system. You can use the `lsof` (list open files) command to identify any processes that have open files on the target file system. Forcibly unmounting a file system while it's in use can lead to data corruption, so it's best to avoid this whenever possible. Mastering mounting and unmounting allows you to manage removable media, network shares, and logical volumes effectively.
Managing Logical Volumes (LVM)
Logical Volume Management (LVM) provides a flexible way to manage disk storage in Linux. LVM allows you to abstract the physical storage from the file system, making it easier to resize, move, and manage storage resources. With LVM, you can create logical volumes (LVs) that span multiple physical disks, providing increased storage capacity and flexibility. LVM also supports features like snapshots, which allow you to create point-in-time copies of your logical volumes for backup or testing purposes.
The basic LVM architecture consists of physical volumes (PVs), volume groups (VGs), and logical volumes (LVs). Physical volumes are typically entire hard drives or partitions that are initialized for use with LVM. A volume group is a container that groups together one or more physical volumes. Logical volumes are then created within the volume group and can be resized or moved as needed.
Common LVM commands include `pvcreate` (create a physical volume), `vgcreate` (create a volume group), `lvcreate` (create a logical volume), `lvresize` (resize a logical volume), and `lvremove` (remove a logical volume). For example, to create a logical volume named "data" with a size of 100GB in the volume group "vg01," you would use the command `lvcreate -L 100G -n data vg01`. LVM offers significant advantages in terms of storage flexibility and manageability, particularly in environments with dynamic storage requirements. It provides a robust framework for managing disk space and adapting to changing needs.
Practical Disk Space Management Techniques
Identifying and Removing Unnecessary Files
One of the simplest ways to free up disk space is to identify and remove unnecessary files. This includes temporary files, old log files, and orphaned files. Temporary files are often stored in directories like `/tmp` and `/var/tmp`. You can use the `find` command to locate files older than a certain age and then delete them. For example, `find /tmp -type f -mtime +7 -delete` would find all files in the `/tmp` directory that are older than 7 days and delete them.Be carefulwhen using the `-delete` option, as it permanently removes the files.
Old log files can also consume a significant amount of space. Many Linux distributions use `logrotate` to automatically manage log files, rotating and compressing them periodically. However, it's still a good idea to review your `logrotate` configuration and adjust the rotation settings if necessary. Orphaned files are files that are no longer associated with any application or user. These can accumulate over time and waste disk space. Identifying and removing these files can be more challenging, but tools like `deborphan` (for Debian-based systems) can help. Regularly decluttering your file system can significantly improve disk space utilization.
Compressing Files and Directories
Compressing files and directories is another effective way to reduce disk space usage. The `gzip`, `bzip2`, and `xz` commands are commonly used for compression in Linux. `gzip` is a widely used compression tool that offers a good balance between compression ratio and speed. `bzip2` typically achieves better compression ratios than `gzip` but is slower. `xz` offers the best compression ratios but is the slowest of the three.
To compress a file using `gzip`, you would use the command `gzip filename`. This creates a compressed file with the `.gz` extension. To decompress the file, you would use the command `gunzip filename.gz`. Similarly, for `bzip2`, you would use `bzip2 filename` and `bunzip2 filename.bz2`. For `xz`, you would use `xz filename` and `unxz filename.xz`. You can also compress entire directories using the `tar` command in conjunction with a compression tool. For example, `tar -czvf archive.tar.gz directory` would create a compressed archive of the specified directory using `gzip`. Compressing large files and directories, especially those that are rarely accessed, can free up a considerable amount of disk space.
Quotas for User Disk Space
Implementing quotas for user disk space is essential in multi-user environments to prevent individual users from consuming excessive storage. Quotas allow you to set limits on the amount of disk space and the number of files that a user can store. There are two types of quotas: block quotas, which limit the amount of disk space a user can use, and inode quotas, which limit the number of files a user can create.
To enable quotas, you need to edit the `/etc/fstab` file and add the `usrquota` and/or `grpquota` options to the file system entry. For example, `UUID=your_uuid /home ext4 defaults,usrquota,grpquota 0 2`. After modifying `/etc/fstab`, you need to remount the file system and run the `quotacheck` command to create the quota files. The `edquota` command is used to edit user quotas. For example, `edquota username` opens a text editor where you can set the soft and hard limits for both block and inode usage. Soft limits allow a user to exceed the quota for a grace period, while hard limits prevent the user from exceeding the quota under any circumstances. The `quota` command allows users to view their current quota usage. Implementing quotas helps ensure fair and efficient allocation of disk space among users.
Advanced Disk Space Monitoring and Alerting
Setting Up Disk Space Monitoring with Nagios or Zabbix
While basic disk space monitoring with `df` and `du` is helpful, more advanced monitoring solutions can provide real-time alerts and historical data analysis. Nagios and Zabbix are two popular open-source monitoring tools that can be used to monitor disk space usage in Linux systems. Nagios uses plugins to monitor various system metrics, including disk space. You can configure Nagios to send alerts when disk space usage exceeds a certain threshold. Zabbix offers a more comprehensive monitoring solution with built-in support for disk space monitoring. Zabbix agents can be installed on the monitored systems, and the Zabbix server can collect data and generate alerts based on pre-defined triggers. Setting up disk space monitoring with Nagios or Zabbix allows you to proactively identify and address potential disk space issues before they impact system performance.
Using ncdu for Interactive Disk Usage Analysis
The `ncdu` (NCurses Disk Usage) tool provides an interactive way to analyze disk space usage in Linux. Unlike `du`, which simply outputs a list of file sizes, `ncdu` presents a navigable interface that allows you to drill down into directories and identify the largest files and directories. `ncdu` uses the NCurses library to create a text-based user interface that can be used in a terminal window.
To use `ncdu`, simply run the command `ncdu` followed by the directory you want to analyze (e.g., `ncdu /var/log`). `ncdu` will scan the directory and display a list of files and directories, sorted by size. You can then use the arrow keys to navigate the directory structure and identify the largest files and directories. `ncdu` also provides options for deleting files and directories directly from the interface. `ncdu` is a powerful tool for quickly identifying and addressing disk space issues in Linux systems. Its interactive interface makes it easy to pinpoint the largest space hogs and take corrective action.
Implementing Automated Disk Space Cleanup Scripts
Automated disk space cleanup scripts can help maintain disk space usage over time. These scripts can be scheduled to run periodically using `cron` and can perform tasks like deleting temporary files, compressing old log files, and removing orphaned files. A simple cleanup script might look like this:
```bash
#!/bin/bash
Delete temporary files older than 7 days in /tmp
find /tmp -type f -mtime +7 -delete
Rotate and compress old log files
logrotate -f /etc/logrotate.conf
Remove orphaned files
deborphan | xargs apt-get -y remove --purge
Exit with success code
exit 0
```
This script first deletes temporary files older than 7 days in the `/tmp` directory. Then, it rotates and compresses old log files using `logrotate`. Finally, it removes orphaned files using `deborphan` and `apt-get`. You can then schedule this script to run daily or weekly using `cron`. To do this, you would add an entry to the `/etc/crontab` file. For example, `0 0 root /path/to/cleanup_script.sh` would run the script every day at midnight. Implementing automated disk space cleanup scripts can significantly reduce the amount of manual effort required to maintain disk space usage.
Conclusion: Mastering Disk Space for a Smoother Linux Experience
This article has equipped you with the knowledge and tools necessary to effectively manage disk space and file systems in your Linux environment. From understanding the basics of disk space monitoring with `df` and `du` to implementing advanced techniques like LVM, quotas, and automated cleanup scripts, you now have a comprehensive toolkit to keep your systems running smoothly. The journey through file systems, understanding types like ext4, XFS, and Btrfs, has hopefully demystified the complexities of storage structures. Remember, proactively monitoring disk space, identifying potential culprits, and implementing appropriate management strategies are crucial for maintaining a healthy and efficient Linux system.
Now, it's your turn to take action! Start by auditing your current disk space usage using the techniques described in this article. Identify the largest files and directories, and implement strategies to reduce their size. Set up disk space monitoring with Nagios or Zabbix to proactively identify potential issues. Finally, create automated disk space cleanup scripts to maintain disk space usage over time. Your servers will thank you!
Ready to ditch the "disk full" panic and embrace a more organized and efficient Linux experience? What are some of the biggest disk space challenges you face in your environment, and how do you plan to tackle them?
Post a Comment for "Linux System Administration: Managing Disk Space and File Systems"
Post a Comment