Linux Server Setup: A Comprehensive Guide
Linux Server Setup: Your Comprehensive Guide to Getting Started
This comprehensive guide will walk you through setting up your own Linux server, whether it's for hosting websites, running applications, or just experimenting with technology.
Hey there, tech enthusiasts and aspiring server wranglers! Ever feel like the internet is this magical black box? You type in a website address, andpoof, content appears! But have you ever stopped to think about what's actuallypoweringthat magic? Chances are, a Linux server is working hard behind the scenes.
Think of it like this: the internet is a giant city, and servers are the skyscrapers that house all the websites and applications. And Linux? Well, Linux is the foundation upon which many of these skyscrapers are built. It's the operating system that keeps everything running smoothly.
Maybe you're tired of relying on expensive hosting providers. Maybe you have a brilliant app idea and need a place to host it. Or maybe you're just a curious soul who wants to understand how things work under the hood. Whatever your reason, setting up your own Linux server can seem daunting. All those command-line interfaces and cryptic configurations…yikes!
But fear not, my friends! This isn't some impenetrable technical manual filled with jargon nobody understands. We're going to break it down step-by-step, in plain English, so you can confidently set up your own server and unleash your inner tech guru. We'll cover everything from choosing the right distribution to securing your server against those pesky cyber-nasties. We'll even throw in a few tips and tricks to make the process a little less… terrifying.
Imagine the possibilities! Hosting your own website, creating a personal cloud storage solution, setting up a game server for you and your friends… The digital world is your oyster! And with this guide, you'll have the tools and knowledge to start exploring it.
Now, I know what you might be thinking: "This sounds complicated. Do I really need to be a computer science genius to do this?" The answer is a resoundingno! You don't need to be Linus Torvalds (the creator of Linux) to get started. All you need is a little patience, a willingness to learn, and this guide to hold your hand along the way.
Think of it like building with LEGOs. Each step is a simple building block, and when you put them all together, you end up with something amazing. We'll start with the basics and gradually build up to more advanced topics. By the end of this article, you'll be a Linux server setuppro!
But before we dive in, let's address the elephant in the room:why Linux? Why not Windows or mac OS Server? Well, there are several reasons why Linux is the king of the server world. First and foremost, it'sfree and open-source. That means you don't have to pay a fortune for licensing fees. Second, it's incrediblystable and reliable. Linux servers are known for their uptime, meaning they can run for months, even years, without needing a reboot. And third, it's incrediblyflexible and customizable. You can tailor it to your specific needs, whether you're running a small personal website or a massive enterprise application.
Still with me? Great! Get ready to embark on an exciting journey into the world of Linux servers. We're going to unlock the secrets of the digital realm and empower you to take control of your own online destiny. So, grab your favorite beverage, settle in, and let's get started! Are you ready to learn how you can finally stop paying those exorbitant fees and become a Linux server master? Let's find out!
Understanding the Basics of Linux Server Setup
Before we jump into the nitty-gritty details, let's lay the groundwork by understanding some fundamental concepts. It's like knowing the rules of the road before you start driving. A solid grasp of these basics will make the entire setup process much smoother and less confusing.
First off, whatexactlyis a Linux server? Simply put, it's a computer running the Linux operating system that's designed to provide services to other computers (clients) over a network. These services can include hosting websites, storing files, managing databases, and much more.
The beauty of Linux is its versatility. It can be used for a wide range of purposes, from powering supercomputers to running embedded systems. And because it's open-source, there's a massive community of developers constantly working to improve it and add new features.
Now, let's talk aboutdistributions, often calleddistros. A Linux distribution is essentially a version of Linux that's packaged with a specific set of tools and applications. Think of it like different flavors of ice cream – they're all ice cream, but they have different tastes and ingredients. Some popular distributions for servers include Ubuntu Server, Debian, Cent OS Stream, and Alma Linux. Each distro has its own strengths and weaknesses, so choosing the right one for your needs is important.
Another key concept is thecommand-line interface (CLI). This is a text-based interface that allows you to interact with the server by typing commands. While it might seem intimidating at first, the CLI is incredibly powerful and efficient. You can accomplish almost anything with a few well-chosen commands. We'll be using the CLI extensively throughout this guide, so get ready to embrace your inner hacker!
Finally, let's touch onsecurity. Security is paramount when setting up a server. You need to protect your server from unauthorized access and malicious attacks. This involves configuring firewalls, setting up strong passwords, and keeping your software up to date. We'll dedicate a significant portion of this guide to security best practices.
Choosing Your Linux Distribution for Server Setup
Selecting the right Linux distribution is a crucial first step. It's like choosing the right foundation for your house – it needs to be solid and reliable. The "best" distribution depends entirely on your specific needs and experience level.
Here's a breakdown of some popular options: Ubuntu Server:This is often recommended for beginners due to its user-friendly interface, extensive documentation, and large community support. Ubuntu is also known for its ease of use and its comprehensive software repository. It’s a great choice for web hosting, application deployment, and general-purpose server tasks.
Debian: This is a more stable and conservative distribution, known for its rock-solid reliability and commitment to free software. Debian is a great option if stability and security are your top priorities. It's often used for mission-critical applications and infrastructure.
Cent OS Stream/Alma Linux: Cent OS Stream is a rolling-release version of Cent OS. Alma Linux is a community-driven, open-source enterprise-grade Linux distribution, it provides a stable and reliable platform. Cent OS Stream and Alma Linux are popular choices for web hosting and enterprise environments. These are often preferred for their stability and compatibility with enterprise software.
Rocky Linux: Another community-driven alternative to Cent OS. Rocky Linux aims to provide a stable, enterprise-ready operating system that is fully compatible with the upstream source code.
When choosing a distribution, consider the following factors: Ease of Use:Are you comfortable with the command line? Do you prefer a graphical user interface?
Community Support:Is there a large and active community that can provide help and support?
Software Availability:Does the distribution have access to the software you need?
Stability:How important is stability to your application?
Security:Does the distribution have a good track record for security?
For beginners, Ubuntu Server is often the best place to start. It's relatively easy to learn, has excellent documentation, and a large community that can help you if you get stuck.
Preparing Your Server Environment for Linux Setup
Before you install Linux, you need to decide where your server will live. You have a few options: Bare Metal:This involves installing Linux directly on a physical server. This gives you the most control over your hardware and resources, but it also requires the most technical expertise.
Virtual Machine (VM): This involves creating a virtual server on your existing computer using virtualization software like Virtual Box or VMware. This is a great option for testing and experimentation, as it allows you to create multiple servers on a single physical machine.
Cloud Server: This involves renting a virtual server from a cloud provider like Amazon Web Services (AWS), Google Cloud Platform (GCP), or Microsoft Azure. This is a great option if you need scalability and reliability. Cloud providers handle the hardware and infrastructure, so you can focus on your applications.
If you're just starting out, using a virtual machine is often the easiest and most cost-effective option. You can install Virtual Box for free and create a virtual machine running your chosen Linux distribution. This allows you to experiment without risking your existing computer.
If you're ready to commit to a dedicated server, you can either purchase a physical server or rent a cloud server. Cloud servers offer a lot of flexibility and scalability, as you can easily increase or decrease your resources as needed.
Once you've chosen your server environment, you need to download the ISO image of your chosen Linux distribution. You can find the ISO image on the distribution's website. An ISO imageis basically a digital copy of an installation disc. You'll need this image to install Linux on your server.
Step-by-Step Linux Server Installation Guide
Alright, let's get our hands dirty and actuallyinstall Linux! The exact steps will vary slightly depending on your chosen distribution and server environment, but here's a general overview:
1.Download the ISO Image: Go to the website of your chosen distribution (e.g., Ubuntu Server) and download the ISO image.
2.Create a Bootable Medium: If you're installing on a physical server, you'll need to create a bootable USB drive or DVD using the ISO image. You can use tools like Rufus (for Windows) or Etcher (cross-platform) to do this.
3.Boot from the Installation Medium: Insert the USB drive or DVD into your server and boot from it. You may need to change the boot order in your BIOS settings.
4.Follow the Installation Wizard: The installation wizard will guide you through the process of partitioning your hard drive, setting up your network, and creating a user account.
5.Choose Installation Options: Select the appropriate installation options based on your needs. For example, you may want to install a minimal server configuration to save disk space and resources.
6.Set a Strong Password: Choose a strong and unique password for your user account. This is crucial for security.
7.Install Updates: Once the installation is complete, be sure to install any available updates. This will ensure that your system is secure and stable.
If you're installing on a virtual machine, the process is similar. You'll need to create a new virtual machine in Virtual Box or VMware and point it to the ISO image. Then, start the virtual machine and follow the installation wizard.
Initial Server Configuration After Linux Setup
Congratulations, you've successfully installed Linux! Now, let's configure your server for optimal performance and security.
Update and Upgrade Your System: The first thing you should do is update and upgrade your system. This will ensure that you have the latest security patches and software updates. Use the following commands:
```bash
sudo apt update
sudo apt upgrade
```
(For Ubuntu/Debian)
```bash
sudo yum update
```
(For Cent OS Stream/Alma Linux/Rocky Linux)
Set Up a Firewall: A firewall is a crucial security measure that protects your server from unauthorized access. UFW (Uncomplicated Firewall) is a user-friendly firewall that's easy to configure.
```bash
sudo apt install ufw
sudo ufw enable
sudo ufw allow ssh
sudo ufw allow 80 # Allow HTTP traffic (for web servers)
sudo ufw allow 443 # Allow HTTPS traffic (for web servers)
sudo ufw status
```
Configure SSH: SSH (Secure Shell) allows you to remotely access your server. It's important to configure SSH properly to prevent unauthorized access.
Disable Password Authentication: Disable password authentication and use SSH keys instead. This is much more secure.
Change the Default SSH Port: Change the default SSH port (22) to a non-standard port. This will make it harder for attackers to find your server.
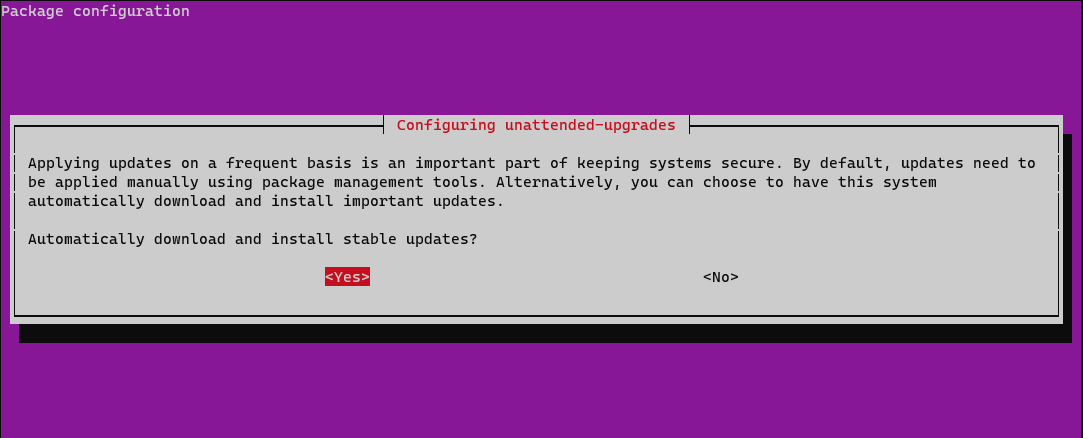
Set Up Automatic Updates: Configure your system to automatically install security updates. This will help to keep your server secure and up to date.
Install Necessary Software: Install any software that you need for your server, such as a web server (Apache or Nginx), a database server (My SQL or Postgre SQL), or a programming language (PHP or Python).
Essential Security Measures for Your Linux Server
Security should be your top priority when setting up a Linux server. A compromised server can lead to data loss, financial damage, and reputational harm.
Keep Your Software Up to Date: This is the most important security measure you can take. Security vulnerabilities are constantly being discovered, and updates often contain patches to fix these vulnerabilities.
Use Strong Passwords: Use strong, unique passwords for all user accounts. A strong password should be at least 12 characters long and contain a mix of uppercase and lowercase letters, numbers, and symbols.
Implement SSH Key Authentication: Ditch passwords for SSH and use SSH keys. It's more secure and easier to manage in the long run.
Regularly Audit Your System: Check logs and system activity to identify any unusual behavior. Tools likefail2bancan automatically block attackers who are trying to brute-force your server.
Disable Unnecessary Services: Disable any services that you don't need. The fewer services you have running, the smaller the attack surface.
Regular Backups: Implement a backup strategy to protect your data in case of a disaster.
Intrusion Detection Systems (IDS) and Intrusion Prevention Systems (IPS): Consider using an IDS or IPS to detect and prevent malicious activity.
Managing Your Linux Server: Essential Commands and Tools
Now that your server is up and running, it's time to learn how to manage it. Here are some essential commands and tools: Command Line Navigation:Commands like `cd`, `ls`, `pwd`, `mkdir`, and `rm` are your bread and butter. Get comfortable navigating the file system from the command line.
Package Management:Use `apt` (for Debian/Ubuntu) or `yum`/`dnf` (for Cent OS Stream/Alma Linux/Rocky Linux) to install, update, and remove software packages.
Text Editing:Learn how to use a text editor like `nano` or `vim` to edit configuration files.
Process Management:Use commands like `ps`, `top`, and `kill` to monitor and manage processes.
Log Analysis:Learn how to read and analyze log files to troubleshoot problems. Logs are your server's diary; they tell you everything that's happening.
Networking:Understand basic networking concepts and commands like `ifconfig` or `ip`, `ping`, and `netstat`.
System Monitoring:Use tools like `top`, `htop`, and `vmstat` to monitor system performance.
Troubleshooting Common Linux Server Issues
Even with the best setup, things can sometimes go wrong. Here are some common issues and how to troubleshoot them: Server Not Responding:Check your network connection, firewall settings, and server resources. If you can't access your server remotely, try accessing it locally.
Website Not Loading: Check your web server configuration, DNS settings, and firewall settings. Also, check your server logs for any errors.
High CPU Usage: Identify the process that's consuming the most CPU and investigate the cause. It could be a runaway process, a resource-intensive application, or a malicious attack.
Disk Space Issues: Check your disk usage and delete any unnecessary files. You can use the `du` command to find large files and directories.
Security Breaches: If you suspect a security breach, immediately disconnect your server from the network, investigate the cause, and take steps to prevent future breaches.
Automation and Scripting for Linux Server Management
To make your life easier, consider automating some of your server management tasks using scripts.Shell scriptingallows you to write simple programs that can perform tasks automatically.
For example, you can write a script to: Back Up Your Data:Automate the process of backing up your data to a remote server or storage device.
Monitor Server Performance: Automate the process of monitoring server performance and sending alerts if thresholds are exceeded.
Install Software: Automate the process of installing software on multiple servers.
Rotate Log Files: Automate the process of rotating log files to prevent them from filling up your hard drive.
Tools likecronallow you to schedule scripts to run automatically at specific times. This is a great way to automate routine tasks.
Conclusion: Your Journey to Linux Server Mastery
Congratulations, friend! You've reached the end of this comprehensive guide to Linux server setup. You've learned the fundamentals of Linux, how to choose the right distribution, how to install and configure your server, and how to secure it against threats. You've also learned some essential commands and tools for managing your server.
To recap, we started with the basic concept of what a Linux server is and why it's so powerful. We then moved on to choosing a distribution that fits your needs, like Ubuntu, Debian, or Cent OS Stream/Alma Linux. From there, we walked through the installation process and covered initial configurations, including setting up firewalls and securing SSH. We also delved into essential security measures, management tools, and troubleshooting tips.
Now it's time to put your knowledge into practice! Choose a project, set up your server, and start experimenting. Don't be afraid to make mistakes – that's how you learn! The Linux community is vast and helpful, so don't hesitate to ask for help when you get stuck. Remember, mastering Linux server setup is a journey, not a destination.
Call to Action:Now that you've learned the basics, take the plunge and set up your own Linux server! Start with a simple project, like hosting a personal website or setting up a file server. The best way to learn is by doing! Then explore more complex projects like deploying a LEMP stack or using Docker to containerize your applications.
With each step, you'll not only enhance your skills, but also become more confident in your ability to manage your own digital infrastructure. You're no longer just a user of the internet, you're now part of the engine that powers it. So go forth and build something amazing! The digital world awaits your creation!
And remember, the journey of a thousand miles begins with a single step (or, in this case, a single `sudo apt update`). Are you ready to take that step and unlock the power of Linux? You got this!
Post a Comment for "Linux Server Setup: A Comprehensive Guide"
Post a Comment